Showing posts with label Week 9. Show all posts

Friday, 20 July 2018

Week 9 - Forefront Friday: Star Wars Battlefront (2015)

I am planning to include a lot of foliage and vegetation growing inside of my mansion environment to emphasize how much time has passed since people actually lived there. This will mean that I need to create some unique assets myself as nothing within the demo pack will help with this.

Before creating my own vegetation I have decided to research some examples at the forefront to better understand how the games industry approaches realistic vegetation.

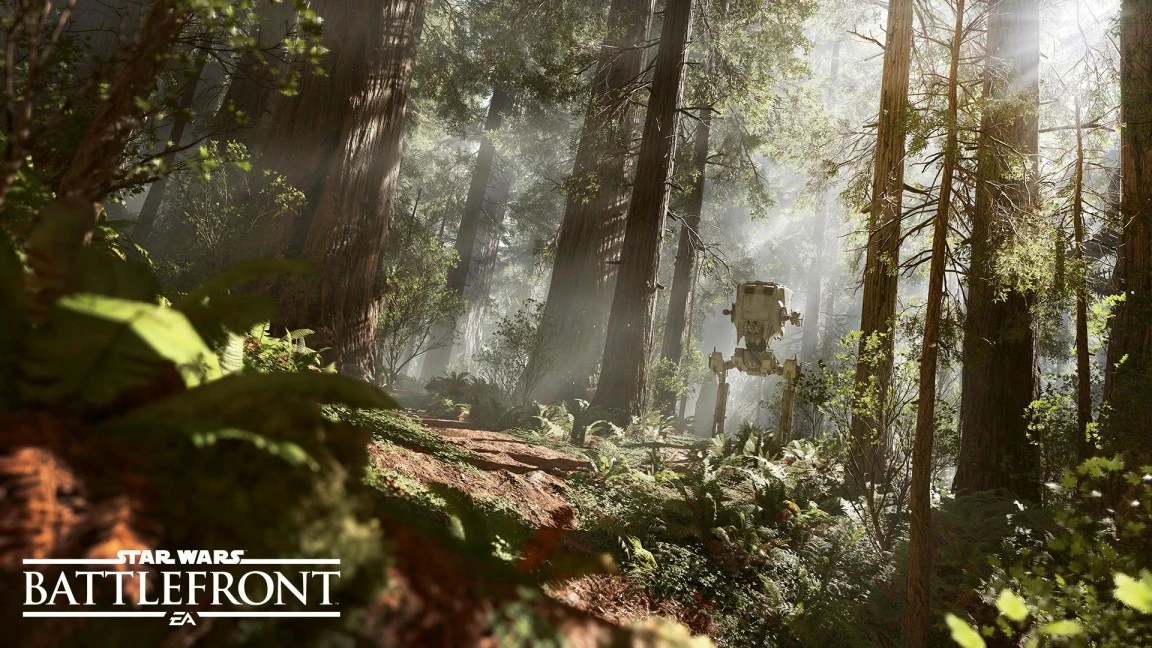
One game that has used photorealism to great effect is DICE Studios and EA Games “Star Wars Battlefront” (2015). Whilst the game itself has been the target of much criticism due to EA’s business practices, few could argue that the games graphics are incredible.

The planet Endor recreated in Star Wars Battlefront 2015.

I consider Star Wars Battlefront (2015) to be at the forefront of the industry because of the level of consideration that has gone into recreating the iconic environments from the films, and the detailed processes DICE have employed to create photo-realistic terrain.

The team at DICE would shoot photos on-location and plan their trips using a breakdown beforehand so they knew which assets needed to be captured during that shooting session. An article from website 3D Scan Expert states that the team put in a lot of effort to ensure that these photo shoots were efficient, because with Photogrammerty often times people end up shooting either too many or too few photos. Below you can see an example of the breakdowns the team would use when going on a photo shoot.

https://3dscanexpert.com/wp-content/uploads/star-wars-battlefront-3d-scanning-elements-768x432.png
An example of the breakdowns DICE Studios used to help organise their photo sessions.

The massive amount of photos were then taken and turned into usable game assets. The team would go through more of less the same phases as they would if they were creating the vegetation in a traditional way but in a quicker time frame. Below you see a comparison between the estimated time to create an asset for an earlier game (Battlefield 4) that used traditional methods and the Photogrammetry pipeline used Star Wars Battlefront. Compare the lengthy time for high poly modelling in a traditional way compared to creating the asset via photo scanning.

star-wars-battlefront-3d-scanning-time
A comparisson of the time required to create an asset with Photogrammetry versus traditional methodology

It is quite clear that DICE have put in great effort into planning the creation of vegetation for their game. My project plan mainly factored in hard surface modelling and texture creation. I did leave myself a small window to create organic assets but it is clear that such a small window will not yield results anywhere near as impressive as Star Wars Battlefront.

This is not a huge issue for me as I am not focused on becoming an organic modeler for my career. Therefore I don’t wish to spend too much time creating detailed vegetation. Photogrammetry definitely seems like the best option for realistic vegetation and foliage due to the near perfect replicas it produces. Because of this, the ability to create detailed vegetation from scratch may not be the most sought skill in the industry at the moment.

Because I don’t have the resources available to create realistic photo scanned models, one option may be for me to download another asset pack from the Unreal Engine marketplace, one that is well suited to create indoor vegetation. I have already saved time on assets such as trees and grass on the exterior sections of my environment, however I am still interested in creating individual pieces such as ivy and weeds myself. Because I want them to conform to the shape of my building perfectly, this is something that I feel I will have better control over if I create them myself.

Ultimately I feel a blending of both my own and professionally made assets will be the best course. I have already made use of the Unreal Engine marketplace, so by studying the assets available I will be able to see how they were created and apply this knowledge to my own work.

DICE. (2015) Star Wars Battlefront. [DISC, DOWNLOAD] Microsoft Windows, PlayStation 4, Xbox One. Redwood City: Electronic Arts.

DICE. (2015), EndorDICE. [Online Image]. Available at: https://vignette.wikia.nocookie.net/battlefront/images/8/81/EndorDICE.jpg/revision/latest?cb=20151111221829 [Accessed: 20/07/2018].

DICE. (2015), PhotoBreakdown. [Online Image]. Available at: https://3dscanexpert.com/wp-content/uploads/star-wars-battlefront-3d-scanning-elements-768x432.png [Accessed: 20/07/2018].

GAMASUTA. (2016) GDC: See how DICE used photogrammetry to bring Star Wars Battlefront to life . [Online] Available from: https://www.gamasutra.com/view/news/265747/GDC_See_how_DICE_used_photogrammetry_to_bring_Star_Wars_Battlefront_to_life.php [Accessed: 20/07/2018]  

LIEVENDAG, N. (2016) How 3D Scanning was used to create the worlds of Star Wars Battlefront. [Online] Available from: https://3dscanexpert.com/3d-scanning-star-wars-battlefront/ [Accessed: 20/07/2018]  

Thursday, 19 July 2018

Week 9 - Thursday: Using 3D Scan Data to Create a Bust of Pallas

With the rise of 3D printing, high quality scans of real world objects have become increasingly easy for people to access. What this means for me as a 3D artist is that I now have a vast resource of detailed 3D models available to tap into.

I found this 3D scanned bust of Pallas Athena from the Altes museum in Berlin:

3D scanned bust of Athena.

I chose a bust of Pallas as a tribute to Edgar Alan Poe's The Raven. In that poem the bust of Pallas Athena represents wisdom, indicating the narrator was a scholar. I really admire when writers leave little clues that inform the reader about a character's personality. I am trying to do the exact same thing in a visual sense, so I wanted to pay homage by including a similar bust above the chamber door. Perhaps the former owner of my mansion also prided himself as a scholar?

In its raw form the model sits at over 600,000 thousand triangles. Obviously not feasible to use as a game asset:

The downloaded 3D model.

I created a low poly model around the high poly mesh and got it ready for surface transfer within Substance Painter:

The low poly variant of the bust of Pallas.

Baking and texturing the maps in Substance Painter was a fast process as I used a lot of smart materials to generate the dirt detail to highlight the bust's facial features.

 The normal map of the bust.

The fully textured asset within Unreal Engine.

It's a bit jagged but because it takes up such a small amount of space in the environment I don't think this will be noticeable. Thanks to the availabilty of 3D scanned assets I now have a wide selection of easy to make 3D assets for my game environment. I don't want to rely too much on free assets however because I am using this project as a demonstration of my own modelling ability. As such I will use this technique when I need to quickly create something that is not feasible within my current timeframes.

MY MINI FACTORY (2015) Bust of Athena at The Altes Museum, Berlin. [Online] Available from: https://www.myminifactory.com/object/3d-print-bust-of-athena-at-the-altes-museum-berlin-14041 [Accessed: 19/07/2008].

POE, E. A. (1845) The Raven. New York City: The American Review.

THE BRITISH MUSEUM (2017) A new dimension in home shopping. [Online] Available from: https://blog.britishmuseum.org/a-new-dimension-in-home-shopping/ [Accessed: 19/07/2008].

Wednesday, 18 July 2018

Week 9 - Wednesday: Tutorial Session

For this week's tutorial session I have been getting some help with adding foliage to my scene in Unreal Engine. Because I don't have the time to invest in creating my own trees, I was recommended to use some of the freely available assets on the Unreal Engine marketplace. I downloaded the Epic Games Open World Demo Collection (2015), which has given me access to a few tree assets as well as some grass. I have also been creating some custom vines that will be growing on the walls of the exterior.

 The vines I have created in 3DS Max.

I was introduced to the foliage brush within Unreal Engine and was shown how to apply lots of assets over a large surface area efficiently. I have begun painting the grass into my environment scene:

The exterior with the grass beginning to be painted in using the foliage brush.

One problem that I have noticed with using the foliage brush is that it treats all the objects that have been painted with it as one asset. Because there is so much grass in the scene the lightmap for this element is ridiculously huge. It was causing my light bake times to get very expensive so as a solution to this I have disabled shadow casting on the grass. This will make the grass look slightly less-realistic, however because there is so much of it in the scene the fact that each blade of grass isn't casting a shadow shouldn't be noticeable.

I am starting to place trees within the scene as well. I am hoping to create some nice long shadows across the environment to indicate the time of day and create some visual interest with the lighting, as currently it feels rather flat.

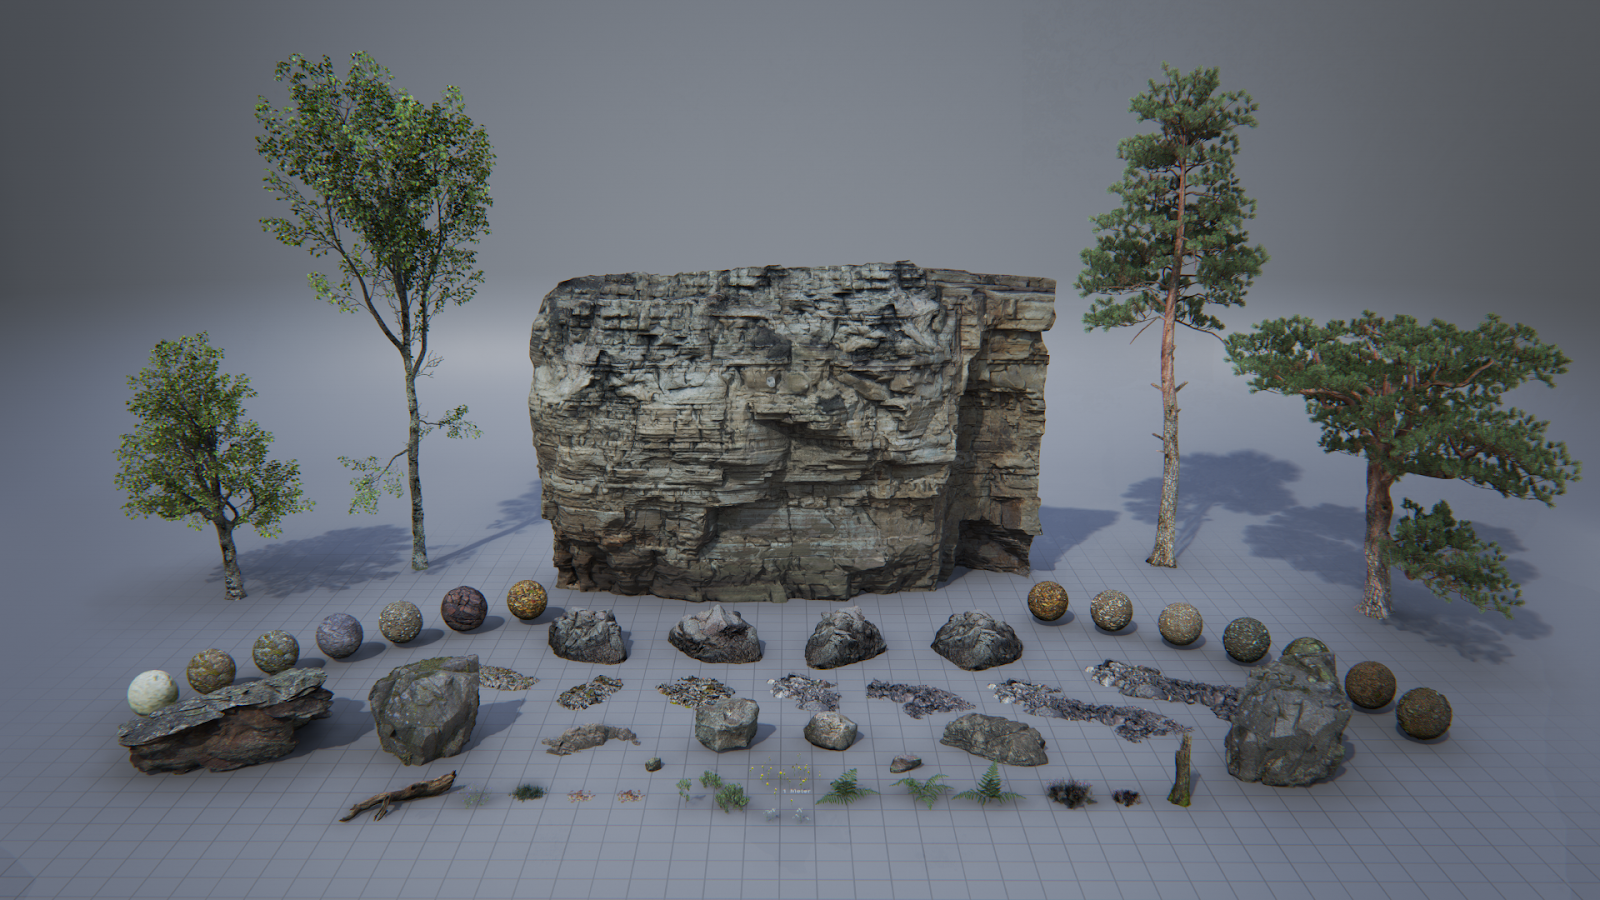
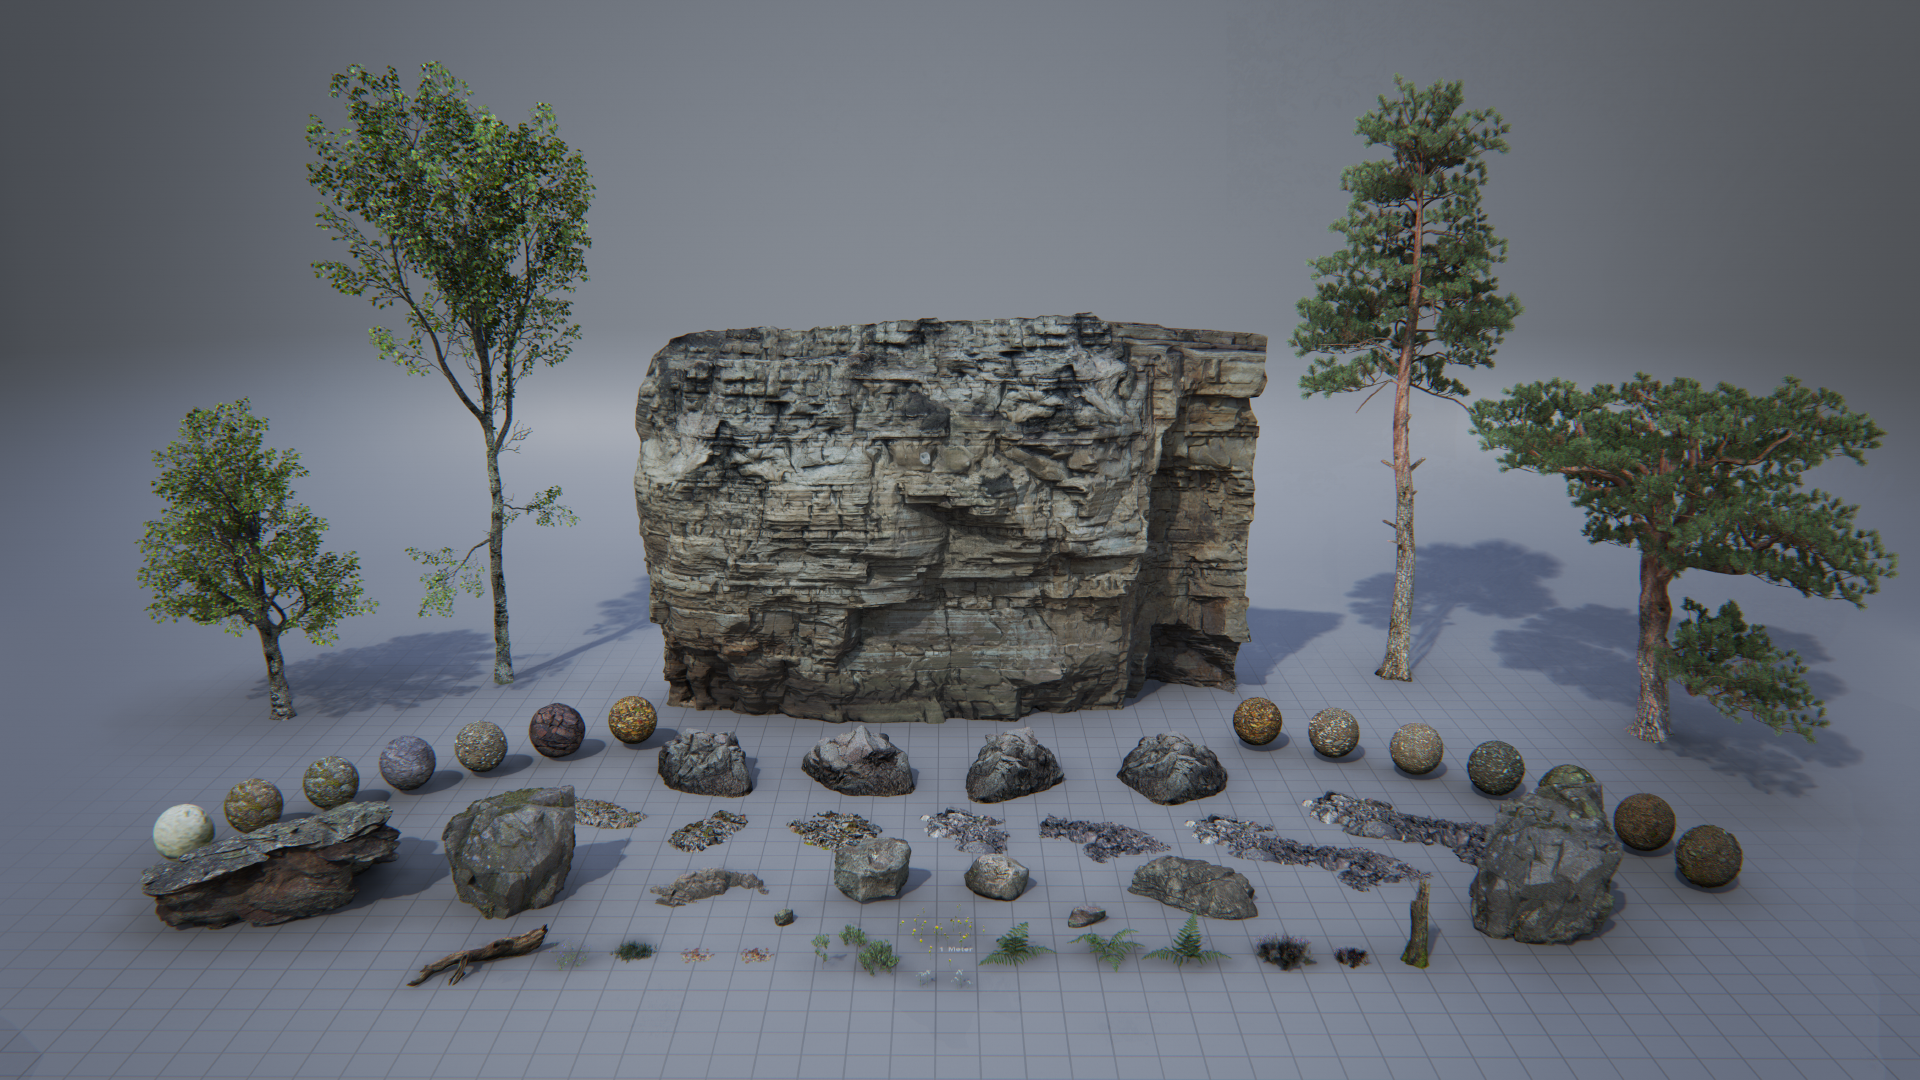
The asset pack I am using contains 4 types of tree, several rocks and smaller vegetation like grass. Each asset comes with its own materials.

EPIC GAMES (2015). Open World Demo Collection. [online] https://www.unrealengine.com/marketplace/open-world-demo-collection [Accessed 17/0/2018].

EPIC GAMES (2015). Open World Demo Collection. [Online Image]. Available at: https://cdn1.epicgames.com/ue/item/000_OverView-1920x1080-c3379c40227fa234cecd992feaade9b5.png [Accessed: 18/07/2018].

Tuesday, 17 July 2018

Week 9 - Tuesday: Roof Damage

In addition to the debris that I have added to the interior, I am also trying to add external damage to the mansion. I took a look at reference of derelict buildings, some from games and others from real photos, to help me focus in on which details to create.

https://cdnb.artstation.com/p/assets/images/images/006/493/351/large/mark-ranson-steamshotcarentan-03.jpg?1499031560
Days of War map Carentan.

 Bush Park, Detroit.


 A derelict house in Ireland.

One element that I really like across all of these images is the large holes in the roofs revealing the scaffolding underneath.

I decided this would be perfect to add to my scene because the roof takes up such a large space in the environment but is an almost featureless element. Adding some variation like holes and broken tiles will really help to break up the flat surface.

I started by cutting out a hole in the geometry of my roof in 3DS Max and then built some exposed wooden planks that would fit in the holes:

Wooden scaffolding that I created in 3DS Max and then textured in Substance Painter. I tried to make the wood look as old and warped as possible.

I created a few planks and then pieced them together into a pattern that I could repeat. I created a wooden plank texture in Substance Painter and then exported the pieces into Unreal Engine.

Here you can see the wooden planks repeated a few times in Unreal Engine. They have helped to break up the otherwise simple roof elements.

I am going to add similar holes across the roof and perhaps even some broken windows. I am aiming to make the exterior scene instantly tell the player everything they need to know about the state of the mansion inside.

Front view of my roof debris.

ALLEN, K. (2005), Derelict house at Raw [Online Image]. Available at: https://www.geograph.org.uk/photo/76559 [Accessed: 16/07/2018].

FERNANDEZ, M. (2012), Detroit o el atractivo de una ciudad hundida [Online Image]. Available at: https://www.yorokobu.es/detroit-o-el-atractivo-de-una-ciudad-hundida/ [Accessed: 16/07/2018].

RANSON, M. (2017), Days of War map Carentan [Online Image]. Available at: https://www.artstation.com/artwork/OVB6y [Accessed: 15/07/2018].

Monday, 16 July 2018

Week 9 - Monday: Debris Simulation

After reading up on how I can better utilise the mise-en-scene of my environment, I decided that I wanted to exaggerate the level of decay that the mansion has fallen into. To do this I came up with a way for quickly adding a large amount of debris to my scene, which I have implemented within my environment today.

Simulating the Debris

Before starting I had two factors to consider. The first was time. This would be how long it would take for me to populate the scene with all the debris that I wanted to include. The second factor was object placement. This would be to make sure that the debris was placed logically and looked natural within the environment.

I could have chosen to spend a lot of time placing objects in my scene manually by eye, but that would have wasted precious hours. Conversely I could have placed things in the scene quickly without much consideration for the logical placement of objects, but that would result in an illogical mess that would look somewhat fake.

The last few weeks of my major project plan.

Because this is the beginning of week nine and I only have three weeks remaining to complete the environment, I decided that time was the most important factor at play. I had the idea to use the Mass FX tool within 3Ds Max to simulate the falling of debris within my scene. By simulating falling objects in the environment like this I could make the debris placement look natural whilst saving myself a LOT of time.

First I had to test whether this technique would work for my purposes. To experiment with my idea, I created a dummy scene with simple box geometry and applied physics to each box. You can see the result of this test below.

Mass FX simple box geometry simulation.

As you can see this was both a quick and realistic way of creating a mess. The boxes fall in a convincing manner resulting in a more natural placement of the objects than I would have been able to achieve if I had tried to place them within my scene by eye.

The beauty of this setup is that I can choose to add more or less objects to the simulation and this will affect the final result of the debris being scattered across the environment.

Once I was satisfied that the simulation was going to work, I created some assets to use as debris. The objects are all using the same texture, making it easy for me to add further details to the material in Unreal Engine. I intend to add a layer of dust to the objects which will only affect the top facing surfaces of the models. This will help break up repetition, as multiple bricks will have dust covering them at a different angle from one another.

 My fully textured debris assets as seen in Substance Painter.

Below you can see the wireframes of the assets. I tried to keep them low poly but high enough so that their silhouettes would still look good.

 The wireframes of the debris assets.

I applied physics to the objects and then created a dummy scene so that I could quickly simulate the objects falling onto each other.

The end result of the Mass FX simulation.

A close up of the debris. You can see how organic the placement of the objects is.

I ran the simulation a few times and once I was happy with the final output I baked the final debris into static geometry and exported it out of 3DS Max into Unreal Engine.

The debris model in my scene within Unreal Engine. I added some additional leaves to the floor as a texture with an opacity mask.

I am pleased with the end result as I feel already this is making the abandoned mansion feel far more authentic. I would like to continue to layer up the floor with additional dirt masks and other bits of debris.

I think it was absolutely worth expending a little extra time experimenting with mass FX simulations as now I can use this technique again and can potentially speed up my workflow by a large amount.