It is the beginning of the final week of my major project development. With my scene completed I will be spending today creating various camera angles that will best show off my environment. In preparation for this, I have been reading up on how cinematography is practiced within film and how certain shot types are used to affect an audience.
Cinematographer Blain Brown has compiled his experience into a book that serves as an introduction to cinematography as it is practiced on a professional level. It covers the essential concept of visual storytelling which is the facet of filmmaking that I find most intriguing and something I have been trying to emulate throughout my own work. I believe the language of Cinema is one that encompasses the art of the lens, composition, visual design and lighting. I feel that by learning these languages I can apply them to the field of game design and use them to help maximize every element within my game environment.
An important aspect of visual storytelling that I felt the author has highlighted is in setting the scene for the audience. Brown (2012:18) explains the importance of “establishing the geography,” whereby the cinematography gives the audience some idea of where they are, what kind of place it is and where objects and people are in relation to each other. Brown continues to explain the utility in letting the audience (or in my case the player) know the “lay of the land” within a scene. Stating that it helps them to orient themselves and prevents confusion that might divert their attention from the story. He highlights that one of the primary goals of the cinematography is to not confuse the audience, and this was a big reason why I was so eager to create an exterior alongside interior environments. I felt that it was important to establish the location and climate so that the player could project themselves seamlessly into the environment and believe it.
I am going to be paying close attention to the language of cinema as I choose my camera angles. This will be especially important as I create my promotional video for my environment. I am aiming to create a certain mood and this will require the camera movement and angles to reflect this.
BROWN, B. (2012) Cinematography: Theory and Practice: Image Making for Cinematographers and Directors., 2nd ed. New York: Focal Press.
Showing posts with label Monday. Show all posts
Showing posts with label Monday. Show all posts
Monday, 6 August 2018

Monday, 30 July 2018
Week 11 - Monday: Project Recap
At the start of week eleven I feel my environment is really starting to come together. I have imported the majority of my assets and have got the lighting to where I want it to be. The remaining steps will be to improve the foliage on the exterior and hopefully bring some inside as well.


The exterior still needs a lot of work as this is where most of my foliage will be seen. I am hoping to bring some greenery to the main entrance hall as well because this will add some nice contrasting green light to the interior.
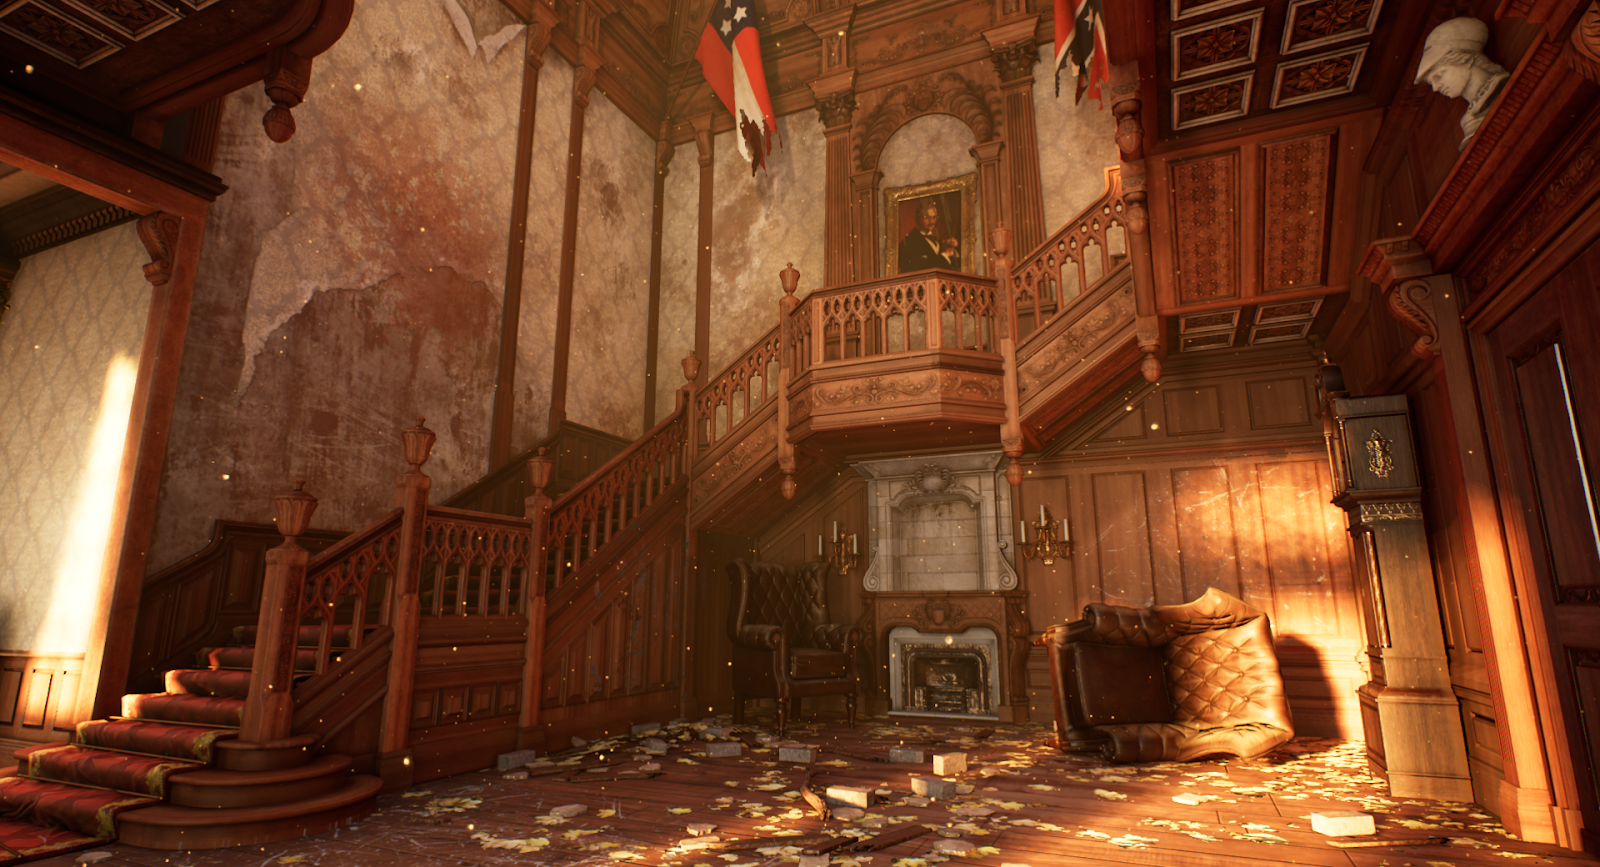
The entrance hall.

View of the hallway.

View of the first floor balcony.

In the hallway looking out towards the entrance hall.
The exterior still needs a lot of work as this is where most of my foliage will be seen. I am hoping to bring some greenery to the main entrance hall as well because this will add some nice contrasting green light to the interior.
Monday, 23 July 2018
Week 10 - Monday: Small Chair
As I draw closer to the end of my degree, I have been researching ways that I can make my portfolio stand out and be more marketable to employers. I found an article on Artstation interviewing industry veteran Robert Hodri, who is currently the senior environment artist at id Software. In the interview he highlighted what to focus on when building a game-centric portfolio.
"At the beginning of your career, you normally won’t be working on a whole level or environment where you have to do everything on your own. At least that’s how it is when you’re working on bigger AAA games. Usually you’re assigned to work on smaller props. That’s why I think it’s important to have at least a couple of high quality props and textures in your portfolio. That can be anything from crates, rocks to weapons and vehicles. Just show that you can create good game art and are familiar with the whole process. Making high poly meshes and baking them down on a low poly is something that every 3D artist needs to know and your portfolio should show that." - Robert Hodri, Senior Environment Artist at id Software.
With this statement in mind I have been creating some more props that I will be displaying in my portfolio. I have been trying to find a balance between giving the model a nice silhouette and keeping it low poly. As such this asset is a lot more expensive than the previous armchair I had created. Currently the mesh sits at around 9k triangles. I can reduce the mesh further so that it is less expensive in-game, but right now I feel getting a strong portfolio piece is of greater importance.
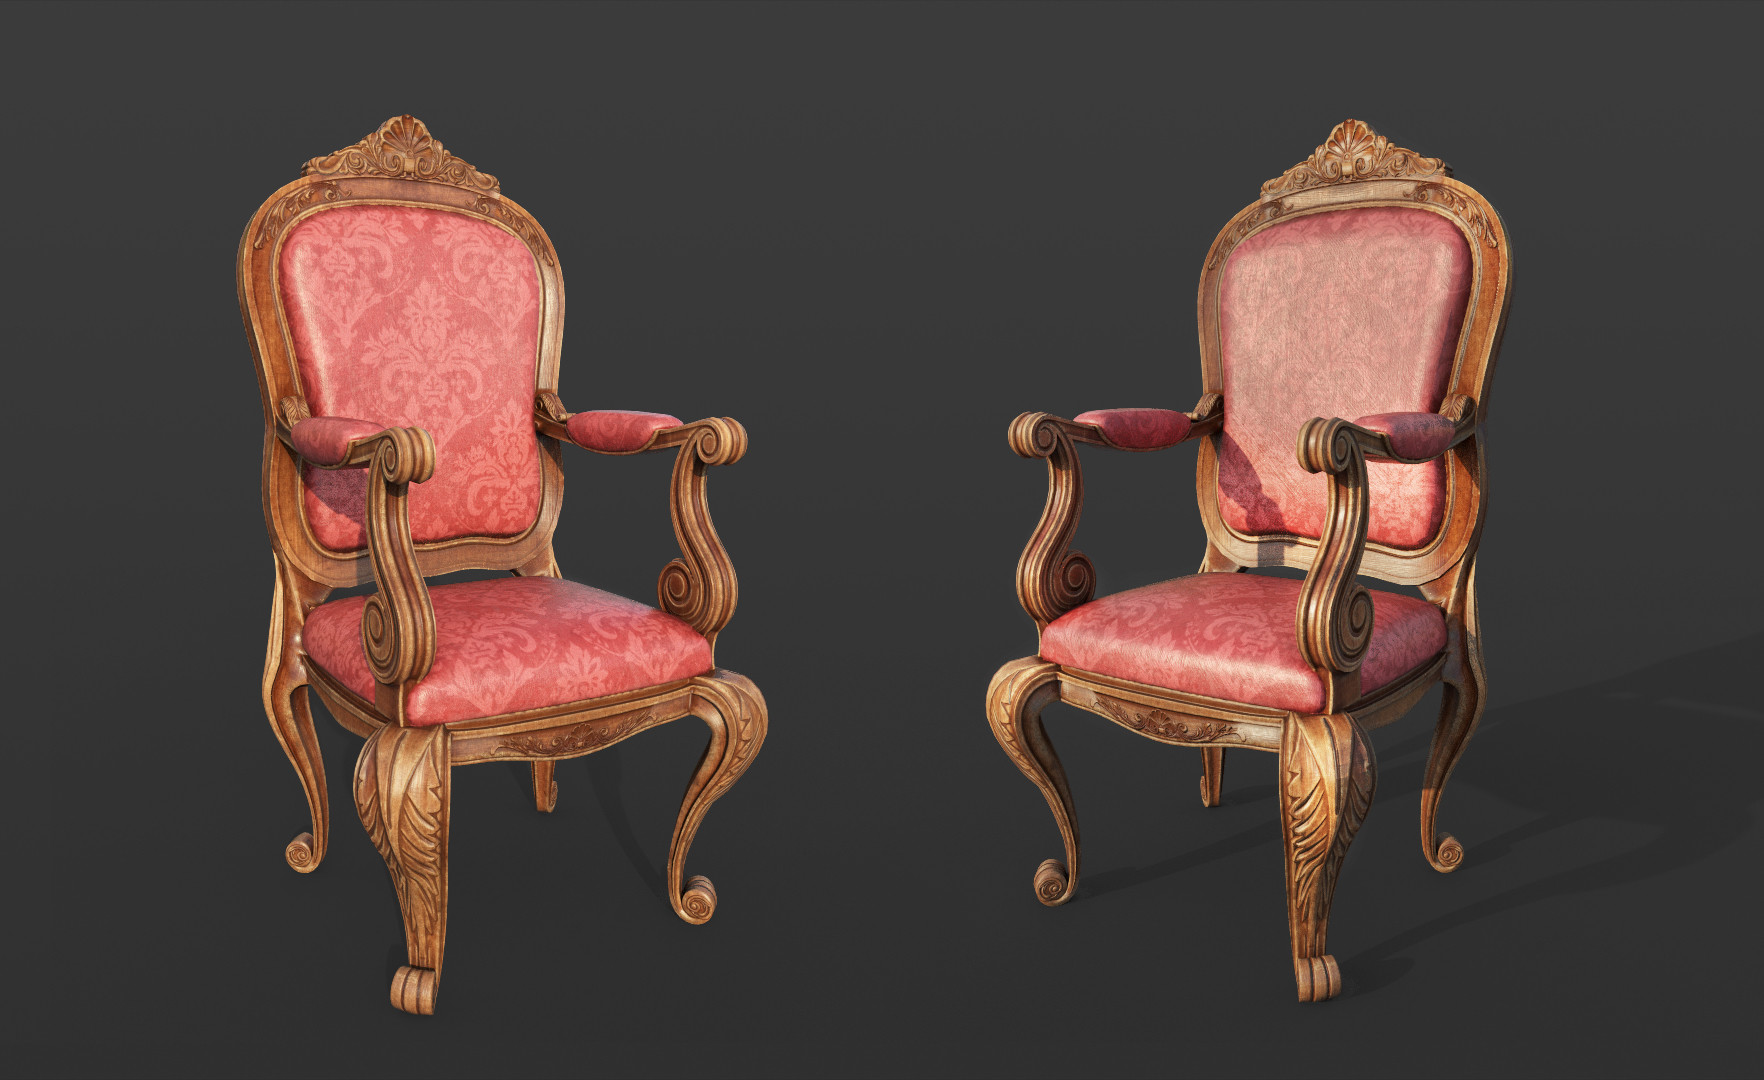
I now have two distinct chair assets in my portfolio showing that I can create props in different styles if needed. I based this model off of this Italian Baroque chair as I felt it would provide me with a good challenge:

I am going to continue tailoring my Artstation page to what triple AAA studios are looking for, as I feel these will be where the most employment opportunities are coming from.
ESCH, N. (2018), One 19th Century Italian Baroque Chair in Peacock Blue [Online Image]. Available at: https://www.monc13.com/products/one-19th-century-italian-baroque-chair-in-peacock-blue-furniture-seating [Accessed: 23/07/2018].
MON, S. (2017) Everything You Need to Know to Become a Game Environment Artist. [Online] Available from: https://magazine.artstation.com/2017/03/game-environment-artist/ [Accessed: 23/07/2018]
"At the beginning of your career, you normally won’t be working on a whole level or environment where you have to do everything on your own. At least that’s how it is when you’re working on bigger AAA games. Usually you’re assigned to work on smaller props. That’s why I think it’s important to have at least a couple of high quality props and textures in your portfolio. That can be anything from crates, rocks to weapons and vehicles. Just show that you can create good game art and are familiar with the whole process. Making high poly meshes and baking them down on a low poly is something that every 3D artist needs to know and your portfolio should show that." - Robert Hodri, Senior Environment Artist at id Software.
With this statement in mind I have been creating some more props that I will be displaying in my portfolio. I have been trying to find a balance between giving the model a nice silhouette and keeping it low poly. As such this asset is a lot more expensive than the previous armchair I had created. Currently the mesh sits at around 9k triangles. I can reduce the mesh further so that it is less expensive in-game, but right now I feel getting a strong portfolio piece is of greater importance.
My new chair props that I have put in my portfolio.
I now have two distinct chair assets in my portfolio showing that I can create props in different styles if needed. I based this model off of this Italian Baroque chair as I felt it would provide me with a good challenge:

A 19th Century Italian Baroque Chair that I used as reference.
I am going to continue tailoring my Artstation page to what triple AAA studios are looking for, as I feel these will be where the most employment opportunities are coming from.
ESCH, N. (2018), One 19th Century Italian Baroque Chair in Peacock Blue [Online Image]. Available at: https://www.monc13.com/products/one-19th-century-italian-baroque-chair-in-peacock-blue-furniture-seating [Accessed: 23/07/2018].
MON, S. (2017) Everything You Need to Know to Become a Game Environment Artist. [Online] Available from: https://magazine.artstation.com/2017/03/game-environment-artist/ [Accessed: 23/07/2018]
Monday, 16 July 2018
Week 9 - Monday: Debris Simulation
After reading up on how I can better utilise the mise-en-scene of my environment, I decided that I wanted to exaggerate the level of decay that the mansion has fallen into. To do this I came up with a way for quickly adding a large amount of debris to my scene, which I have implemented within my environment today.
Simulating the Debris
Before starting I had two factors to consider. The first was time. This would be how long it would take for me to populate the scene with all the debris that I wanted to include. The second factor was object placement. This would be to make sure that the debris was placed logically and looked natural within the environment.
I could have chosen to spend a lot of time placing objects in my scene manually by eye, but that would have wasted precious hours. Conversely I could have placed things in the scene quickly without much consideration for the logical placement of objects, but that would result in an illogical mess that would look somewhat fake.

Because this is the beginning of week nine and I only have three weeks remaining to complete the environment, I decided that time was the most important factor at play. I had the idea to use the Mass FX tool within 3Ds Max to simulate the falling of debris within my scene. By simulating falling objects in the environment like this I could make the debris placement look natural whilst saving myself a LOT of time.
First I had to test whether this technique would work for my purposes. To experiment with my idea, I created a dummy scene with simple box geometry and applied physics to each box. You can see the result of this test below.

As you can see this was both a quick and realistic way of creating a mess. The boxes fall in a convincing manner resulting in a more natural placement of the objects than I would have been able to achieve if I had tried to place them within my scene by eye.
The beauty of this setup is that I can choose to add more or less objects to the simulation and this will affect the final result of the debris being scattered across the environment.
Once I was satisfied that the simulation was going to work, I created some assets to use as debris. The objects are all using the same texture, making it easy for me to add further details to the material in Unreal Engine. I intend to add a layer of dust to the objects which will only affect the top facing surfaces of the models. This will help break up repetition, as multiple bricks will have dust covering them at a different angle from one another.

Below you can see the wireframes of the assets. I tried to keep them low poly but high enough so that their silhouettes would still look good.


I ran the simulation a few times and once I was happy with the final output I baked the final debris into static geometry and exported it out of 3DS Max into Unreal Engine.

I am pleased with the end result as I feel already this is making the abandoned mansion feel far more authentic. I would like to continue to layer up the floor with additional dirt masks and other bits of debris.
I think it was absolutely worth expending a little extra time experimenting with mass FX simulations as now I can use this technique again and can potentially speed up my workflow by a large amount.
Simulating the Debris
Before starting I had two factors to consider. The first was time. This would be how long it would take for me to populate the scene with all the debris that I wanted to include. The second factor was object placement. This would be to make sure that the debris was placed logically and looked natural within the environment.
I could have chosen to spend a lot of time placing objects in my scene manually by eye, but that would have wasted precious hours. Conversely I could have placed things in the scene quickly without much consideration for the logical placement of objects, but that would result in an illogical mess that would look somewhat fake.

The last few weeks of my major project plan.
Because this is the beginning of week nine and I only have three weeks remaining to complete the environment, I decided that time was the most important factor at play. I had the idea to use the Mass FX tool within 3Ds Max to simulate the falling of debris within my scene. By simulating falling objects in the environment like this I could make the debris placement look natural whilst saving myself a LOT of time.
First I had to test whether this technique would work for my purposes. To experiment with my idea, I created a dummy scene with simple box geometry and applied physics to each box. You can see the result of this test below.

Mass FX simple box geometry simulation.
As you can see this was both a quick and realistic way of creating a mess. The boxes fall in a convincing manner resulting in a more natural placement of the objects than I would have been able to achieve if I had tried to place them within my scene by eye.
The beauty of this setup is that I can choose to add more or less objects to the simulation and this will affect the final result of the debris being scattered across the environment.
Once I was satisfied that the simulation was going to work, I created some assets to use as debris. The objects are all using the same texture, making it easy for me to add further details to the material in Unreal Engine. I intend to add a layer of dust to the objects which will only affect the top facing surfaces of the models. This will help break up repetition, as multiple bricks will have dust covering them at a different angle from one another.

My fully textured debris assets as seen in Substance Painter.
Below you can see the wireframes of the assets. I tried to keep them low poly but high enough so that their silhouettes would still look good.

The wireframes of the debris assets.
I applied physics to the objects and then created a dummy scene so that I could quickly simulate the objects falling onto each other.

The end result of the Mass FX simulation.

A close up of the debris. You can see how organic the placement of the objects is.
I ran the simulation a few times and once I was happy with the final output I baked the final debris into static geometry and exported it out of 3DS Max into Unreal Engine.

The debris model in my scene within Unreal Engine. I added some additional leaves to the floor as a texture with an opacity mask.
I am pleased with the end result as I feel already this is making the abandoned mansion feel far more authentic. I would like to continue to layer up the floor with additional dirt masks and other bits of debris.
I think it was absolutely worth expending a little extra time experimenting with mass FX simulations as now I can use this technique again and can potentially speed up my workflow by a large amount.
Monday, 9 July 2018
Week 8 - Monday: LOD Test
Level of Detail or LOD, is a method for simplifying the geometry of a mesh so that the game engine requires less resources to display it in-game. A common use of this is to display a large array of assets on screen at once without a severe hit to the games performance. The LOD will progressively raise or lower the detail of the assets relative to the player's proximity to them. If done effectively the reduced visual quality of the models will often go unnoticed. A noteworthy example of this would be the 2017 game The Legend of Zelda: The Breath of the Wild, in which a vast landscape is fully open for the player to explore.

Whilst I am certainly not creating anything near the scale of Hyrule, I acknowledge the importance of using Levels of Detail to boost a game's performance. I have several high poly assets that I want to reduce in size and decided to practice using LOD's on one of them. I selected my model of a Corinthian capital because it has about 10k triangles, making it a good specimen to experiment with.

I had two options for creating LOD's for this model. I could either use 3DS Max and manually create lower resolution versions of the model, or I could use the in-built LOD feature within Unreal Engine. I chose to use Unreal Engine as I was able to provide a better representation of the technique in action, which you can see in the animation below:
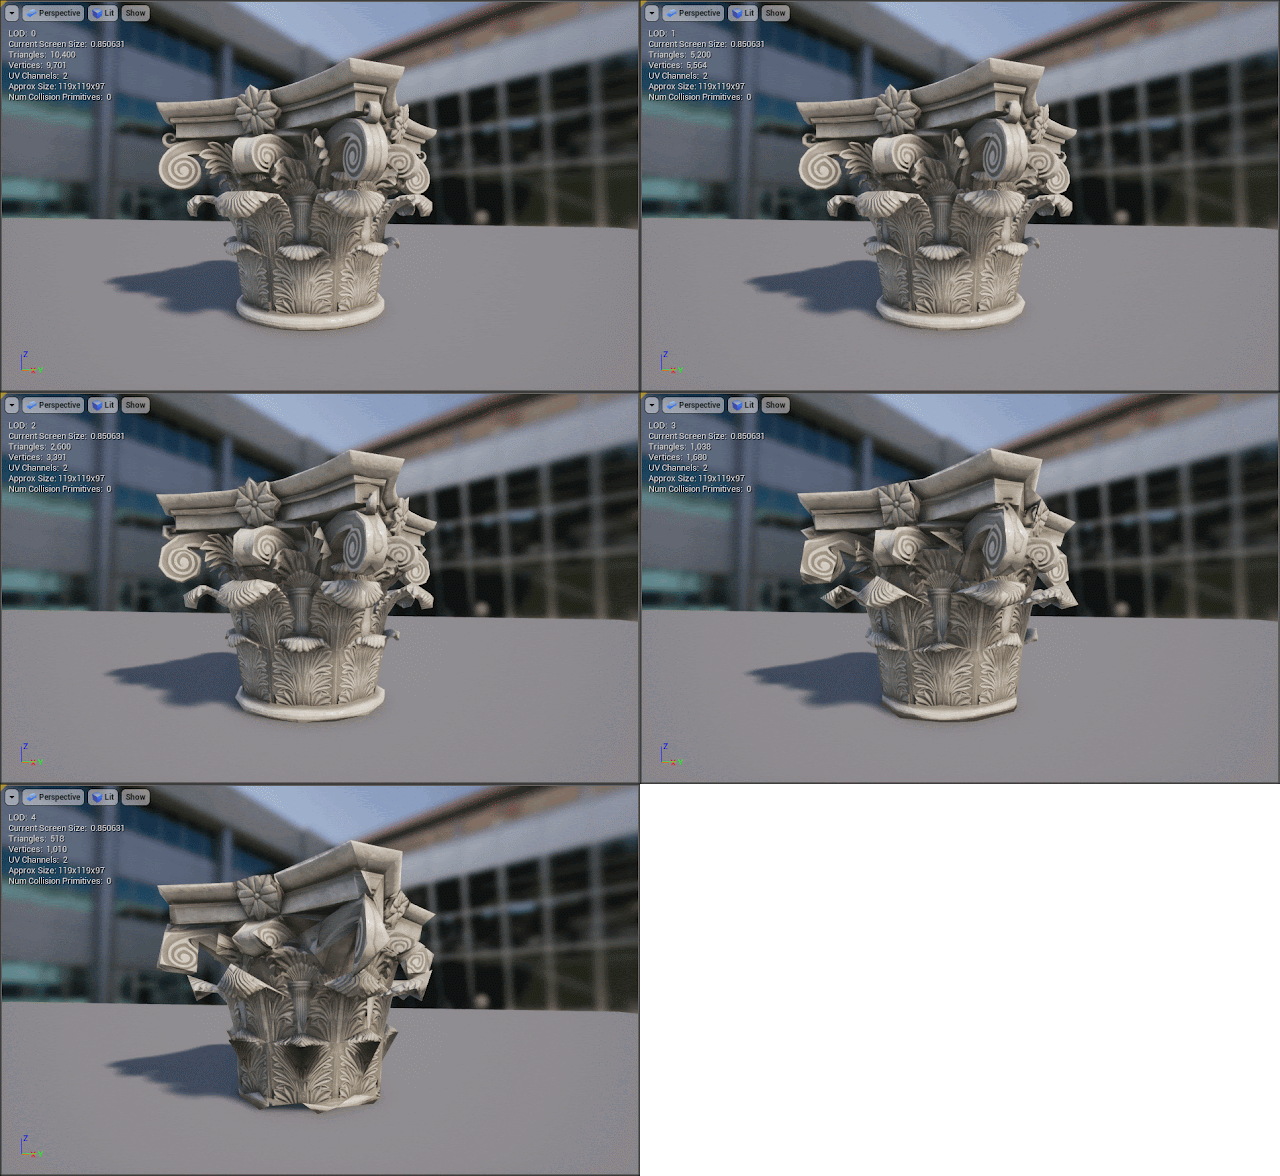
I intend to apply LOD's to some of the higher density assets that I have in my scene. I think anything above 5K triangles that will be repeated en masse should have at least one LOD. As I am creating a smaller scale environment I can get away with not using LOD's on a lot of geometry. That being said, I intend to use LOD's to straight up halve the amount of triangles on some assets as the effect is almost unnoticeable from a distance. For the Corinthian capital I will limit the asset to two LOD's as the geometry starts to look very jagged from LOD 2 onwards.
Using LOD's in my environment is important to show that it is fit for purpose as a fully functional game environment within Unreal Engine.
NINTENDO. (2017) The Legend of Zelda: Breath of the Wild. [CARTRIDGE] Nintendo Switch. Kyoto: Nintendo
UNREAL ENGINE. (2018) Creating and Using LODs. [Online] Available from: https://docs.unrealengine.com/en-us/Engine/Content/Types/StaticMeshes/HowTo/LODs [Accessed: 9th July 2018]
The Legend of Zelda: Breath of the Wild (2017) uses LOD's to display the vast kingdom of Hyrule that loads in detail the closer the player gets.
Whilst I am certainly not creating anything near the scale of Hyrule, I acknowledge the importance of using Levels of Detail to boost a game's performance. I have several high poly assets that I want to reduce in size and decided to practice using LOD's on one of them. I selected my model of a Corinthian capital because it has about 10k triangles, making it a good specimen to experiment with.

My Corinthian capital model at about 10k tri's.
I had two options for creating LOD's for this model. I could either use 3DS Max and manually create lower resolution versions of the model, or I could use the in-built LOD feature within Unreal Engine. I chose to use Unreal Engine as I was able to provide a better representation of the technique in action, which you can see in the animation below:

Here you can see the result of applying different LOD's. Ideally they would be applied the further away from the camera they are, but to better illustrate my results I have manually toggled them on. Notice how drastically the triangle count drops in the top left of the screen per LOD.
I intend to apply LOD's to some of the higher density assets that I have in my scene. I think anything above 5K triangles that will be repeated en masse should have at least one LOD. As I am creating a smaller scale environment I can get away with not using LOD's on a lot of geometry. That being said, I intend to use LOD's to straight up halve the amount of triangles on some assets as the effect is almost unnoticeable from a distance. For the Corinthian capital I will limit the asset to two LOD's as the geometry starts to look very jagged from LOD 2 onwards.
Using LOD's in my environment is important to show that it is fit for purpose as a fully functional game environment within Unreal Engine.
NINTENDO. (2017) The Legend of Zelda: Breath of the Wild. [CARTRIDGE] Nintendo Switch. Kyoto: Nintendo
UNREAL ENGINE. (2018) Creating and Using LODs. [Online] Available from: https://docs.unrealengine.com/en-us/Engine/Content/Types/StaticMeshes/HowTo/LODs [Accessed: 9th July 2018]
Monday, 2 July 2018
Week 7 - Monday: Custom Brick Texture
I have started bringing the external features of my mansion into Unreal Engine. I decided as I was doing so to try and create my own brick material for use on the exterior walls of the mansion. I was inspired by some custom materials that 3D game developer Mark Ranson has been posting on his Artstation page, which he created by baking high poly geometry down into a tileable texture.
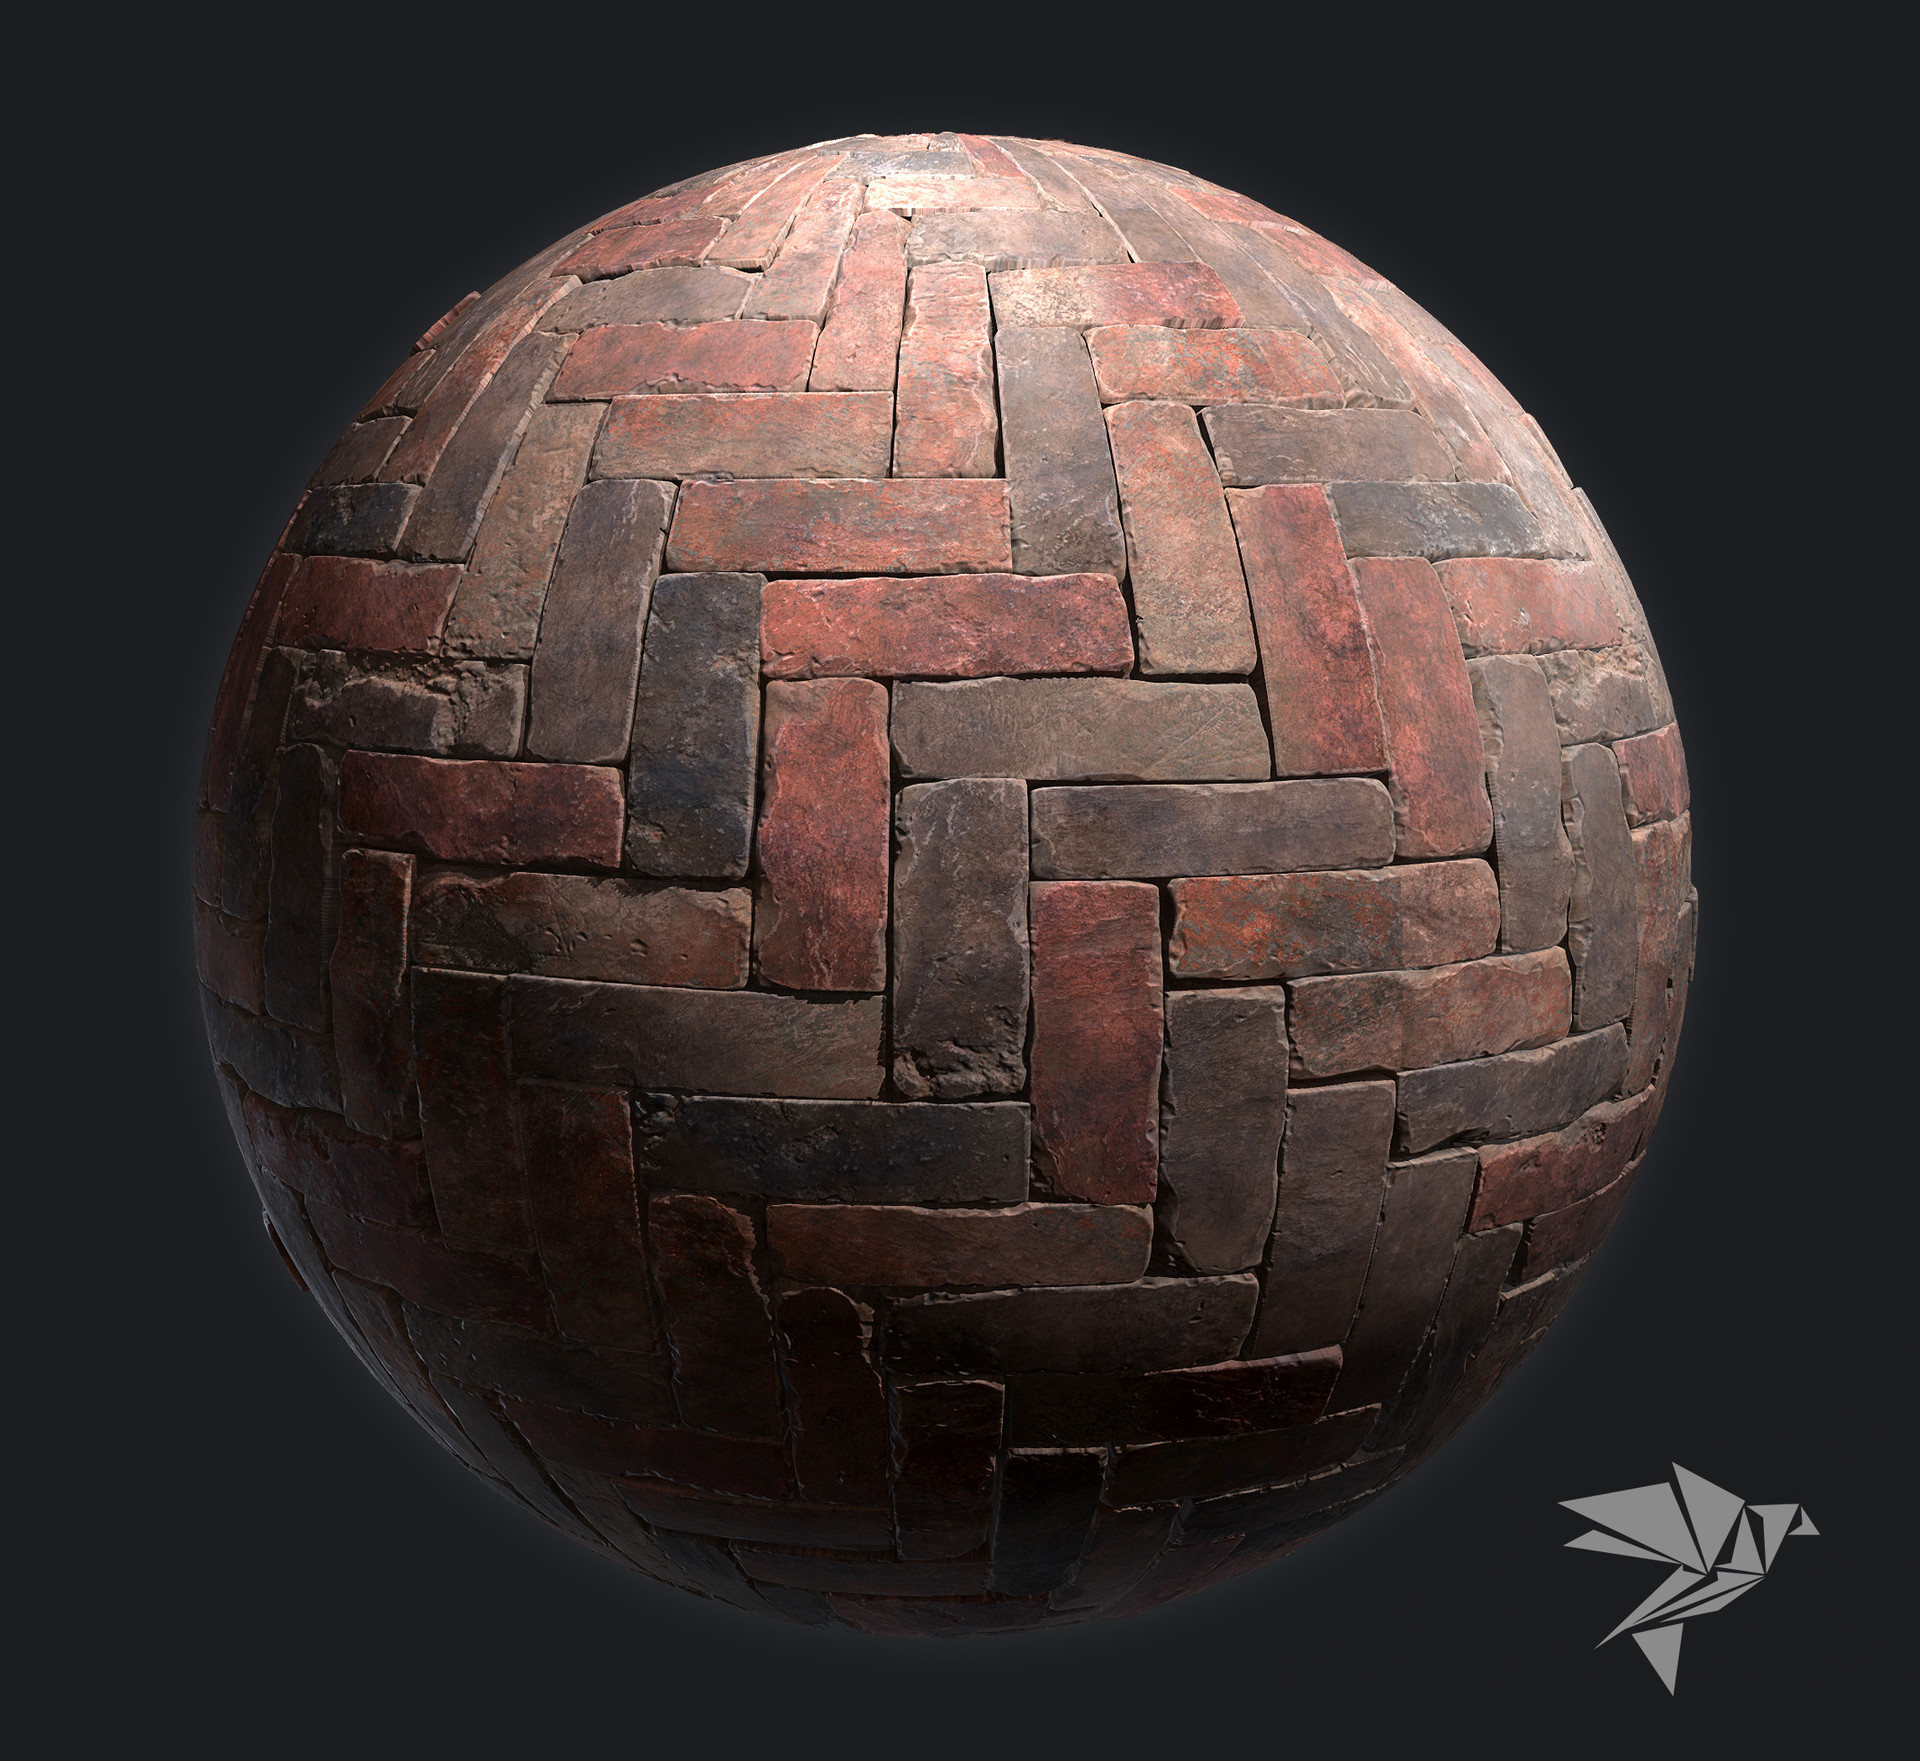
I felt it would be very useful to try doing this for myself, as I would be able to create the brick material to my own specification rather than rely on Google images and hope that it would have what I was looking for.
I started by creating a single brick model and tessellating the mesh so that it was dense enough to start adding details. I then stacked some editable modifiers onto the mesh so that I could add differentiation to each individual brick and avoid obvious tiling.

Once the brick setup was complete, I created a 2048 x 2048 plane and subdivided it evenly so that I could accurately space the bricks across it:

I then rotated some of the bricks to create a little more variation in the pattern, as I felt it would look strange if they were aligned perfectly with one another:

I then exported the 2048 x 2048 plane into Substance Painter and baked the high poly geometry onto it. You can see that the bake still looks rather flat. I intend to add parallax occlusion mapping as Mark has done with his material to help add some height to the texture.

I added some standard Substance Materials to the texture and painted some of the bricks a slightly different colour to make it look more varied. I ended up toning this done however as it made the texture look very repetitive when it was tiled over a large surface:

Once I was happy with the look of the material I loaded it into Unreal Engine. I was pleased that I succeeded in creating a completely seamless texture but I am worried it will look unrealistic if it covers such a wide area:

I have tried to make the tiling less noticeable by placing columns in front of open areas. So far I haven't applied the parallax occlusion mapping to the material yet and this may help to break it up further.

As a test I think this was a successful exercise. I was able to create a seamless texture in a relatively short amount of time and should I need to do something similar again in the future, I know I can rely on this method.
Whilst the technique is sound, I think that the overall appearance of the material needs improvement. When comparing this material to something created using photogrammetry techniques, mine looks very fake. I would like to start blending this material with dirt and decals in Unreal Engine to help ground it in some realism.
RANSON, M. (2018). High-Quality PBR Industrial Herringbone Brick [Online Image]. Available at: https://www.artstation.com/artwork/59X1A [Accessed: 02/07/2018].
Mark Ranson's brick material inspired me to create my own.
I felt it would be very useful to try doing this for myself, as I would be able to create the brick material to my own specification rather than rely on Google images and hope that it would have what I was looking for.
I started by creating a single brick model and tessellating the mesh so that it was dense enough to start adding details. I then stacked some editable modifiers onto the mesh so that I could add differentiation to each individual brick and avoid obvious tiling.

My brick model with added noise and displacement modifiers to help vary its shape.
Once the brick setup was complete, I created a 2048 x 2048 plane and subdivided it evenly so that I could accurately space the bricks across it:

By spacing the bricks evenly across this plane I intended to create a completely seamless texture.
I then rotated some of the bricks to create a little more variation in the pattern, as I felt it would look strange if they were aligned perfectly with one another:

The rotated bricks add some further variation to the pattern.
I then exported the 2048 x 2048 plane into Substance Painter and baked the high poly geometry onto it. You can see that the bake still looks rather flat. I intend to add parallax occlusion mapping as Mark has done with his material to help add some height to the texture.

A flat plane baked with the normal maps generated by the brick pattern that I made.
I added some standard Substance Materials to the texture and painted some of the bricks a slightly different colour to make it look more varied. I ended up toning this done however as it made the texture look very repetitive when it was tiled over a large surface:

The painted texture in Substance Painter.
Once I was happy with the look of the material I loaded it into Unreal Engine. I was pleased that I succeeded in creating a completely seamless texture but I am worried it will look unrealistic if it covers such a wide area:

My seamless brick texture as seen in Unreal Engine.
I have tried to make the tiling less noticeable by placing columns in front of open areas. So far I haven't applied the parallax occlusion mapping to the material yet and this may help to break it up further.

The brick material applied to an external wall.
As a test I think this was a successful exercise. I was able to create a seamless texture in a relatively short amount of time and should I need to do something similar again in the future, I know I can rely on this method.
Whilst the technique is sound, I think that the overall appearance of the material needs improvement. When comparing this material to something created using photogrammetry techniques, mine looks very fake. I would like to start blending this material with dirt and decals in Unreal Engine to help ground it in some realism.
RANSON, M. (2018). High-Quality PBR Industrial Herringbone Brick [Online Image]. Available at: https://www.artstation.com/artwork/59X1A [Accessed: 02/07/2018].
Monday, 25 June 2018
Week 6 - Monday: Codemasters and Rebellion Visit
Today I had the opportunity to visit Codemasters and Rebellion game studios. We were given an extensive tour of both studios and it was nice to have a direct comparison between Codemasters, who specialise in racing games, and Rebellion, who are more action game oriented.
We started with Codemasters and I was both impressed with the size of the studio and the amount of people they have working there, which numbered in the hundreds. I received an in-depth break down of their production process, starting with their research phase and running all the way through to the technical artists who bring everything together into their custom game engine.
I think what left the biggest impression on me was the sheer amount of research the art team put into designing each track for the game. I was shown mood boards and research presentations with hundreds of reference photos for a single level. The team were given an ample amount of time for research and they even invested money into outsourcing photographers to collect reference for them.
As I have been working on my major project, it made me realise how useful it would have been for me to have the design of my environment completely ironed out during the production phase and should I ever find work in a professional studio, it is nice to know that every aspect of a level’s design will have gone through a tremendous amount of scrutiny. I think I would have benefited from this assuredness in my design, as I tend to second guess myself and change design elements as I am working which has cost me a lot of time.
I was keen to see how the environment art team went about creating assets and was pleased to see that everyone was using 3DS Max which is my 3D modelling application of choice. The chief reason they cited for this was the use of splines which allow geometry to be manipulated along a set path. As they are creating racing games this makes a lot of sense because they can create a road using a spline and then make their assets conform along it. This is the same technique that I used on my carpet to create the intricate pattern along the trim.
I was also pleased to see that the environment artists created modular pieces within 3DS Max and rather than export them separately into their game engine, they would piece them together beforehand in Max. This is something I do as well because I find that Max gives you greater precision when it comes to piecing assets together in certain situations.
Overall I really enjoyed seeing Codemasters and I went from not being interested in working on racing games at all, into seriously considering applying for a job there. Given that I am already familiar with 3DS Max I feel the transition to their pipeline might not be too severe.
From there we went to visit Rebellion where we had a presentation from the Oliver twins who have been in the industry for over four decades. They gave us a look at the production process for several of their games as well as some career advice. Andrew Oliver said it was a good idea to apply for work in an area where there were multiple game studios operating. He said that often times when an artist leaves one company they are very likely to get snatched up by another in the area. Both Codemasters and Rebellion are based in Leamington Spa, and from everything I’ve seen it looks like a good area to start applying for work.
Whilst at Rebellion I also received a one to one portfolio review from environment artist Ryan Astley. I showed him my work and he told me how I could improve my presentation for some pieces. He really liked my newest asset, the leather armchair and told me that it was exactly how I should be presenting my work. This was great news as it is my latest piece and I feel reassured that I am making steps in the right direction from an employability stand point. He also told me to organise my work into categories which I have done by separating my game art work from my architectural visualisations.
On the whole it was a very insightful experience and I have gained a new appreciation for how much talent and resources go into creating triple A games. I feel I have been given a good jumping off point to start applying for work thanks to the feedback I received, as well as the Oliver twin’s presentation on finding employment.
We started with Codemasters and I was both impressed with the size of the studio and the amount of people they have working there, which numbered in the hundreds. I received an in-depth break down of their production process, starting with their research phase and running all the way through to the technical artists who bring everything together into their custom game engine.
I think what left the biggest impression on me was the sheer amount of research the art team put into designing each track for the game. I was shown mood boards and research presentations with hundreds of reference photos for a single level. The team were given an ample amount of time for research and they even invested money into outsourcing photographers to collect reference for them.
As I have been working on my major project, it made me realise how useful it would have been for me to have the design of my environment completely ironed out during the production phase and should I ever find work in a professional studio, it is nice to know that every aspect of a level’s design will have gone through a tremendous amount of scrutiny. I think I would have benefited from this assuredness in my design, as I tend to second guess myself and change design elements as I am working which has cost me a lot of time.
I was keen to see how the environment art team went about creating assets and was pleased to see that everyone was using 3DS Max which is my 3D modelling application of choice. The chief reason they cited for this was the use of splines which allow geometry to be manipulated along a set path. As they are creating racing games this makes a lot of sense because they can create a road using a spline and then make their assets conform along it. This is the same technique that I used on my carpet to create the intricate pattern along the trim.
I was also pleased to see that the environment artists created modular pieces within 3DS Max and rather than export them separately into their game engine, they would piece them together beforehand in Max. This is something I do as well because I find that Max gives you greater precision when it comes to piecing assets together in certain situations.
Overall I really enjoyed seeing Codemasters and I went from not being interested in working on racing games at all, into seriously considering applying for a job there. Given that I am already familiar with 3DS Max I feel the transition to their pipeline might not be too severe.
From there we went to visit Rebellion where we had a presentation from the Oliver twins who have been in the industry for over four decades. They gave us a look at the production process for several of their games as well as some career advice. Andrew Oliver said it was a good idea to apply for work in an area where there were multiple game studios operating. He said that often times when an artist leaves one company they are very likely to get snatched up by another in the area. Both Codemasters and Rebellion are based in Leamington Spa, and from everything I’ve seen it looks like a good area to start applying for work.
Whilst at Rebellion I also received a one to one portfolio review from environment artist Ryan Astley. I showed him my work and he told me how I could improve my presentation for some pieces. He really liked my newest asset, the leather armchair and told me that it was exactly how I should be presenting my work. This was great news as it is my latest piece and I feel reassured that I am making steps in the right direction from an employability stand point. He also told me to organise my work into categories which I have done by separating my game art work from my architectural visualisations.
On the whole it was a very insightful experience and I have gained a new appreciation for how much talent and resources go into creating triple A games. I feel I have been given a good jumping off point to start applying for work thanks to the feedback I received, as well as the Oliver twin’s presentation on finding employment.
Monday, 18 June 2018
Week 5 - Monday: Identifying my target audience
My main goal with this project is to create a standout portfolio piece, one that will help me find employment within the games industry. Ideally I want this project to serve as the culmination of my skills and be the project I go to first when showing my work to other artists. With this in mind I have been tailoring the project for art directors, lead environment artists and prop artists within the gaming industry.
I have been making sure to spend a good amount of time on the individual assets within my environment so that I have more than just a "pretty" finished piece by the end of the thirteen week development period. These individual assets will be uploaded separately to my Artstation portfolio so that I can give each asset the attention it deserves. I am particularly interested in working as an environment prop artist, so I want to make it clear that I have adhered to the current practices of the industry. This will involve presenting my work in a way that demonstrates clearly how I have made each prop. For example I will include wireframe breakdowns as well as the low and high poly meshes for people to view.
I hope that by doing this I will show that I am a professional creative practitioner as evidenced by every element of my completed environment. My presentation of the finished environment will be crucial so I will continue to organise my online portfolio so that it is obvious to other professionals that I am creating content worthy of triple A gaming.
I am currently working on another prop for my environment, a leather armchair. I will be posting it to my blog and Artstation page as soon as it is finished. Once I have a game-ready prop in my portfolio I will begin to apply for jobs in the industry.
I have been making sure to spend a good amount of time on the individual assets within my environment so that I have more than just a "pretty" finished piece by the end of the thirteen week development period. These individual assets will be uploaded separately to my Artstation portfolio so that I can give each asset the attention it deserves. I am particularly interested in working as an environment prop artist, so I want to make it clear that I have adhered to the current practices of the industry. This will involve presenting my work in a way that demonstrates clearly how I have made each prop. For example I will include wireframe breakdowns as well as the low and high poly meshes for people to view.
I hope that by doing this I will show that I am a professional creative practitioner as evidenced by every element of my completed environment. My presentation of the finished environment will be crucial so I will continue to organise my online portfolio so that it is obvious to other professionals that I am creating content worthy of triple A gaming.
I am currently working on another prop for my environment, a leather armchair. I will be posting it to my blog and Artstation page as soon as it is finished. Once I have a game-ready prop in my portfolio I will begin to apply for jobs in the industry.
Monday, 11 June 2018
Week 4 - Monday: Project Management Review
At the start of week 4 I have got several assets created for my environment such as my grandfather clock and fireplace. Now I would like to complete the interiors that house them. My schedule has only given me a week left to do the remaining environment modelling, and I now realise that I was being over optimistic to think that I would have most of the environment completed by this stage.

I definitely miscalculated the time it would take to model the environment, and so far I have found that I have been doing other tasks alongside the environment modelling phase. I am going to reorganise this schedule as I think isolating the different activities does not reflect how I work. I have noticed myself switching between activities quite frequently and I think this has proved beneficial so far because I have started using Unreal Engine much earlier than I would have if I had stuck to my original plan. Because of this I was able to innovate my production pipeline and speed up my texture creation process amongst other things. I also think it is refreshing to be able to switch to a different assignment when one task becomes too repetitive. This has given me a fresh perspective on my project as I am not looking at it purely in 3DS Max but across a range of programs from Unreal Engine to Substance Painter.

My chart with only a week left to model the environment!
I definitely miscalculated the time it would take to model the environment, and so far I have found that I have been doing other tasks alongside the environment modelling phase. I am going to reorganise this schedule as I think isolating the different activities does not reflect how I work. I have noticed myself switching between activities quite frequently and I think this has proved beneficial so far because I have started using Unreal Engine much earlier than I would have if I had stuck to my original plan. Because of this I was able to innovate my production pipeline and speed up my texture creation process amongst other things. I also think it is refreshing to be able to switch to a different assignment when one task becomes too repetitive. This has given me a fresh perspective on my project as I am not looking at it purely in 3DS Max but across a range of programs from Unreal Engine to Substance Painter.
Monday, 4 June 2018
Week 3 - Monday: Stairway Rug
I have been looking at some other game environments with a similar theme to my project and found this piece by artist Zack Parkinson:

I feel that the ruffled carpet on the stairway gives a lot of credibility to Zack's environment because it is slightly messy, which adds a touch of realism to the scene. I was curious about how he went about creating this asset and I found this article from 80 Level.com which provided a lot of helpful information on how Parkinson created his environment.
 80 LEVEL (2017) Tips and Tricks of 3d Interior Production. [Online] Available from:
Zack stated that he used Marvelous Designer to create the folds of his carpet. Unfortunately I didn't have access to this software, so I ended up creating my stairway carpet entirely within 3DS Max. I still used the ProOptimiser modifier that he suggested to reduce the poly count at the end. My method had the drawback of not being able to create the final UV map first as I wasn't simulating fabric but manually creating the folds onto the geometry myself. This was a time consuming method but I did come up with some creative solutions to speeding the process up a bit. In future I would like to invest in learning Marvelous Designer as any tool that can make my workflow more efficient will always be worth it in my opinion.
I started by extruding the faces of my existing stairway and adding cuts along the surface of the faces. Adding additional edges will cause the geometry to "tighten" in those areas when smoothed. You can see the results of this in the image below:

On the left hand side is the model with the additional edges that I added to create the appearance of fabric. On the right side is the model once it has been smoothed with the Turbo Smooth modifier. You can see this is quite a simple way of adding creases to geometry. A benefit to this method is that I had complete control of where I wanted the creases to appear, something that simulations don't always give you.

Once the model has been smoothed, the resulting polygon count of the geometry is very expensive:

The folded details at the end of the carpets were simulated using the Cloth modifier in 3DS max. I chose to simulate these details instead of modelling them as I had done for the smaller creases on the steps. I felt as these folds were going to be far more complex, it would be easier to get a realistic looking result by using the Cloth simulation rather than modelling them myself. I created a new poly plane and applied the Cloth modifier alongside a series of collision objects for the cloth to interact with. You can see the simulation below:

Once the simulation was complete and I was happy with how the folded fabric looked, I then converted the plane into an editable poly and stitched it together with my main carpet model. Once it was attached I then turbo smoothed the geometry and added the Shell modifier to give some thickness to the carpet:

With the high poly model completed I then added the ProOptimiser modifier to greatly reduce the polycount of the model:

I may have perhaps reduced the details of the carpet too much, as I now have a lot of ugly jagged edges. I wasn't sure if I could get away with more polygons for a single asset when it was already quite heavy to begin with. If I were to do this again I probably would increase the poly count, as visual quality is more important for this project then whether the thing is optimised well. Zack Parkinson seemed to keep his carpet quite high poly to preserve the details and this is something I wished I had done as well:
 PARKINSON, Z. (2017). ProOptimizer - Preserve UV's.
[Online Image] Available at: https://80.lv/articles/tips-and-tricks-of-3d-interior-production/ [04/06/2018].
PARKINSON, Z. (2017). ProOptimizer - Preserve UV's.
[Online Image] Available at: https://80.lv/articles/tips-and-tricks-of-3d-interior-production/ [04/06/2018].
With the low poly model complete, I created my UV maps and exported both the high poly and low poly models into Substance Painter for normal detail and ambient occlusion baking. You can see the base colour, normal value and ambient occlusion pass on the texture below:

I looked at some images of stair carpets online and wanted to add some additional details to the texture such as a pattern running along the edges of the carpet. To do this would be a little tricky as I would need the pattern to adhere to the folds of the fabric in order to maintain realism. I started by selecting one of the ornate details that I had made earlier to use for my pattern:

Once I had my details selected I used a feature within 3DS Max called the Align Spacing Tool. This lets you select geometry and make it follow along a spline path:

You can see this was a helpful tool for creating a pattern for the edge of the carpet:

I exported my baked texture from Substance Painter and applied it to a square plane within 3DS Max. This enabled me to trace out a spline path along the edges of the carpet. The spline paths are represented by the thick white lines:

Below you can see the pattern following along the spline path:

Because these are all 3D models, I then had to turn them into a texture so that I could apply the pattern to my material in Substance Painter.

Once the pattern was finished I then rendered the scene from a top-down orthographic view in 3DS Max. I then took the render into Photoshop and created this alpha mask for the pattern that I could use in Substance Painter:

This let me add my pattern to my material in the precise location that I wanted it. Once the alpha mask was in Substance Painter it was a quick process to create the final look of the material. You can see the finished stairway rug below:


Here's how it looks in the scene so far:


Overall I am quite pleased with the asset. There are still a few things I am going to change such as the underside of the carpet which looks a bit strange when you are close to it in the engine. I will be aiming to add more assets like this to the environment as I feel the 'messy' look of the carpet helps to show that the mansion is abandoned.
Whilst it did take a long time to setup, I do think the results of my technique were successful. However if I can save time I would still like to learn how to use Marvelous Designer as I cannot afford to spend this amount of time on every asset in my scene.
I'm going to be using 80 Level a lot more from this point onward as they have lots of helpful level breakdowns that I would like to reference to help me get better as an environment artist and perfect my workflow.

PARKINSON, Z. (2017). Abandoned Scottish Manor.
[Online Image] Available at: https://www.artstation.com/artwork/BDXzl [04/06/2018].
I feel that the ruffled carpet on the stairway gives a lot of credibility to Zack's environment because it is slightly messy, which adds a touch of realism to the scene. I was curious about how he went about creating this asset and I found this article from 80 Level.com which provided a lot of helpful information on how Parkinson created his environment.
 80 LEVEL (2017) Tips and Tricks of 3d Interior Production. [Online] Available from:
https://80.lv/articles/tips-and-tricks-of-3d-interior-production/
[Accessed: 04/06/2018]
Zack stated that he used Marvelous Designer to create the folds of his carpet. Unfortunately I didn't have access to this software, so I ended up creating my stairway carpet entirely within 3DS Max. I still used the ProOptimiser modifier that he suggested to reduce the poly count at the end. My method had the drawback of not being able to create the final UV map first as I wasn't simulating fabric but manually creating the folds onto the geometry myself. This was a time consuming method but I did come up with some creative solutions to speeding the process up a bit. In future I would like to invest in learning Marvelous Designer as any tool that can make my workflow more efficient will always be worth it in my opinion.
I started by extruding the faces of my existing stairway and adding cuts along the surface of the faces. Adding additional edges will cause the geometry to "tighten" in those areas when smoothed. You can see the results of this in the image below:

The folds in the geometry were modelled manually and then smoothed out using the Turbo Smooth modifier.
On the left hand side is the model with the additional edges that I added to create the appearance of fabric. On the right side is the model once it has been smoothed with the Turbo Smooth modifier. You can see this is quite a simple way of adding creases to geometry. A benefit to this method is that I had complete control of where I wanted the creases to appear, something that simulations don't always give you.

The finished carpet.
Once the model has been smoothed, the resulting polygon count of the geometry is very expensive:

The wireframe view of the high poly model.
The folded details at the end of the carpets were simulated using the Cloth modifier in 3DS max. I chose to simulate these details instead of modelling them as I had done for the smaller creases on the steps. I felt as these folds were going to be far more complex, it would be easier to get a realistic looking result by using the Cloth simulation rather than modelling them myself. I created a new poly plane and applied the Cloth modifier alongside a series of collision objects for the cloth to interact with. You can see the simulation below:
An animation of my cloth simulation in action.
Once the simulation was complete and I was happy with how the folded fabric looked, I then converted the plane into an editable poly and stitched it together with my main carpet model. Once it was attached I then turbo smoothed the geometry and added the Shell modifier to give some thickness to the carpet:

The completed carpet combined with the folded cloth simulation.
With the high poly model completed I then added the ProOptimiser modifier to greatly reduce the polycount of the model:

Creating a low poly carpet by using the ProOptimiser modifier. You can see how the mesh has been converted into triangles making it ideal for game engines.
I may have perhaps reduced the details of the carpet too much, as I now have a lot of ugly jagged edges. I wasn't sure if I could get away with more polygons for a single asset when it was already quite heavy to begin with. If I were to do this again I probably would increase the poly count, as visual quality is more important for this project then whether the thing is optimised well. Zack Parkinson seemed to keep his carpet quite high poly to preserve the details and this is something I wished I had done as well:
With the low poly model complete, I created my UV maps and exported both the high poly and low poly models into Substance Painter for normal detail and ambient occlusion baking. You can see the base colour, normal value and ambient occlusion pass on the texture below:

The results of baking the high poly model onto its low poly counterpart in Substance Painter.
I looked at some images of stair carpets online and wanted to add some additional details to the texture such as a pattern running along the edges of the carpet. To do this would be a little tricky as I would need the pattern to adhere to the folds of the fabric in order to maintain realism. I started by selecting one of the ornate details that I had made earlier to use for my pattern:

The detailed 3D model I chose to use as the trim pattern on my carpet.
Once I had my details selected I used a feature within 3DS Max called the Align Spacing Tool. This lets you select geometry and make it follow along a spline path:

Taking a model and making it conform along a spline.
You can see this was a helpful tool for creating a pattern for the edge of the carpet:

The model following the spline path. I can increase the amount of times the pattern repeats along the selected path if I wish.
I exported my baked texture from Substance Painter and applied it to a square plane within 3DS Max. This enabled me to trace out a spline path along the edges of the carpet. The spline paths are represented by the thick white lines:

Creating spline paths along the edges of my carpet.
Below you can see the pattern following along the spline path:

My 3D model has been applied to the spline paths along the edges of my carpet texture.
Because these are all 3D models, I then had to turn them into a texture so that I could apply the pattern to my material in Substance Painter.

The pattern is comprised of hundreds of 3D models and needs to be turned into a texture.
Once the pattern was finished I then rendered the scene from a top-down orthographic view in 3DS Max. I then took the render into Photoshop and created this alpha mask for the pattern that I could use in Substance Painter:

I created this alpha mask from my render in 3DS Max.
This let me add my pattern to my material in the precise location that I wanted it. Once the alpha mask was in Substance Painter it was a quick process to create the final look of the material. You can see the finished stairway rug below:


Here's how it looks in the scene so far:


Overall I am quite pleased with the asset. There are still a few things I am going to change such as the underside of the carpet which looks a bit strange when you are close to it in the engine. I will be aiming to add more assets like this to the environment as I feel the 'messy' look of the carpet helps to show that the mansion is abandoned.
Whilst it did take a long time to setup, I do think the results of my technique were successful. However if I can save time I would still like to learn how to use Marvelous Designer as I cannot afford to spend this amount of time on every asset in my scene.
I'm going to be using 80 Level a lot more from this point onward as they have lots of helpful level breakdowns that I would like to reference to help me get better as an environment artist and perfect my workflow.
Monday, 28 May 2018
Week 2 - Monday: Project Aims and Time Management
As it is the start of the second week of my major project development, I feel it will be helpful for me to evaluate what I am aiming to achieve and the methods I will use to present the project as a whole.
Making assets conform to game engine requirments
Currently this project is being created with the intention that it will run through Unreal Engine 4. As such it is not only about making the models look good, but also making sure that the models and assets I create meet the requirements of the engine. For me this means using my poly budget wisely to create assets that are readable from a distance.
For example the silhouette of an object in a game is important for players that are navigating the environment in order for them to understand what the thing is supposed to be. That may sound obvious but for some assets I created during previous projects I only focused on making them low poly without giving much consideration for the silhouette, and as a result the assets looked less believable. From this point onward I am aiming to make the shape of the assets in my environment read better from further away, as I feel this is something future employers will be paying attention to when looking at my work.
Plans for Distribution:
I will be using the Unreal Engine to create still renders of the environment and then distributing these via Artstation. I will also create a fly-through video of my game level that showcases all the details of the environment from different angles. I feel that a video accompaniment compliments still images nicely and gives people a closer look at the intricacies of the environment.
Currently I have only considered Artstation as the main vector of disseminating my project, however I will be doing some research into other potential vectors that I can use to maximise my projects viewership.
What I am hoping to improve on:
My ability with lighting and scene composition is rather weak at the moment. When I enter my career I would like to mainly focus on asset modelling and texturing as this is where I feel I am strongest. However as I am working solo on this project I need to pick up the slack in other departments, particularly lighting as this is an element that will contribute greatly to how good the final environment looks.
Because my knowledge and understanding of lighting is lacking in comparison to my other skills, I will be investing some time in studying some of the free to download scenes from the Epic Games launcher so that I can get to grips with the intricacies of lighting in Unreal.
Project Planning:
As it is the start of my second week working on the project, I may need to factor in more time for me to practice lighting in Unreal Engine. So far I have allowed only a few weeks at the start of the project to create the 3D elements that I will need. This may have been a little too optimistic, as I now realise I will be creating the environment in tandem with the other assignments such as UV mapping and creating textures for the models in Substance Painter.

I feel that I have made a lot of progress during the first week although I haven't modelled as much as I thought by this point. I will be reorganising this schedule to better reflect my working habits, so I can accurately plan my project accordingly.
Making assets conform to game engine requirments
Currently this project is being created with the intention that it will run through Unreal Engine 4. As such it is not only about making the models look good, but also making sure that the models and assets I create meet the requirements of the engine. For me this means using my poly budget wisely to create assets that are readable from a distance.
For example the silhouette of an object in a game is important for players that are navigating the environment in order for them to understand what the thing is supposed to be. That may sound obvious but for some assets I created during previous projects I only focused on making them low poly without giving much consideration for the silhouette, and as a result the assets looked less believable. From this point onward I am aiming to make the shape of the assets in my environment read better from further away, as I feel this is something future employers will be paying attention to when looking at my work.
Plans for Distribution:
I will be using the Unreal Engine to create still renders of the environment and then distributing these via Artstation. I will also create a fly-through video of my game level that showcases all the details of the environment from different angles. I feel that a video accompaniment compliments still images nicely and gives people a closer look at the intricacies of the environment.
Currently I have only considered Artstation as the main vector of disseminating my project, however I will be doing some research into other potential vectors that I can use to maximise my projects viewership.
What I am hoping to improve on:
My ability with lighting and scene composition is rather weak at the moment. When I enter my career I would like to mainly focus on asset modelling and texturing as this is where I feel I am strongest. However as I am working solo on this project I need to pick up the slack in other departments, particularly lighting as this is an element that will contribute greatly to how good the final environment looks.
Because my knowledge and understanding of lighting is lacking in comparison to my other skills, I will be investing some time in studying some of the free to download scenes from the Epic Games launcher so that I can get to grips with the intricacies of lighting in Unreal.
Project Planning:
As it is the start of my second week working on the project, I may need to factor in more time for me to practice lighting in Unreal Engine. So far I have allowed only a few weeks at the start of the project to create the 3D elements that I will need. This may have been a little too optimistic, as I now realise I will be creating the environment in tandem with the other assignments such as UV mapping and creating textures for the models in Substance Painter.

The start of week two on my project plan.
I feel that I have made a lot of progress during the first week although I haven't modelled as much as I thought by this point. I will be reorganising this schedule to better reflect my working habits, so I can accurately plan my project accordingly.
Monday, 21 May 2018
Week 1 - Monday: Project Planning with an Updated Schedule
With the completion of my major study planning folder, I
have updated my project schedule Gantt chart. I have tried to keep this chart
as streamlined and easy to read as possible. I have broken down my schedule
into 13 weeks with each week being further organised into individual days. By
breaking the schedule down into sizeable chunks, I can easily keep track of
each day and assignment then cross them off as they are completed. By doing this
I will also be using this Gantt chart as my project calendar.

I have tried to give myself enough time in each area of production whilst keeping my chart easy to read and concise. I have intentionally tried to streamline this schedule so that there is no confusion. I feel this is the best approach for me, as I don’t feel as overwhelmed about the amount of work when it is visually condensed in this way.
I feel I have
set myself a realistic schedule which includes the timetabled tutorials and
symposium sessions as well as the weekends in which I will not have access to computer
rooms in the Film and Music building. Because of this I have tried to factor in
a buffer time for further development and problem solving as I will likely come
across unexpected production issues over the course of the module and may not
have access to the facilities I require throughout the full production.
As I am working
individually, I have built my project around the areas I am strongest in. This
means that I have tried to maximise the amount of time for 3D modeling and asset creation.
Subscribe to:
Posts (Atom)