Death Stranding
(TBA) is an upcoming video game that was first revealed at E3 in 2016. I
cite this as an example of the forefront because of its prioritisation
of narrative over gameplay in a climate where story driven games are being
seen as less viable by larger game studios such as EA games for example.
Death
Stranding is a unique case because it has generated an enormous amount
of interest without revealing any information about how it will actually
play. Because of this, I feel it serves as a great example of video
games subverting the medium and challenging what we expect from them.
With the casting of high profile actor Norman Reedus as the leading
role, I believe Death Stranding is blurring the lines between video
games and film. When asked whether there would be a blending between the
two mediums, the games director Hideo Kojima responded:
“The
process is almost the same. The only difference nowadays is if they are
interactive or not. When it comes to the fact of controlling, being
able to adjust the camera, I think that will keep changing and this will
be an element that will increasingly be combined and maybe the line
between these two mediums will disappear.”
Kojima
is somewhat infamous for having lengthy cutscenes in his games and I am
expecting Death Stranding to be no exception. However it looks like
this game will be pushing the boundaries as to what it means to be a
cinematic gaming experience. The emphasis on narrative could mean that
the game will be unlike anything ever released. Either way I find this
to be a very interesting title that could catch the attention of
filmmakers eager to experiment with the way visual stories are told.
In
terms of my major project development, I am eager to place an emphasis
on the story aspect of my game environment, as I believe my skills as an
artist will reflect how clearly the story is conveyed through the
imagery. If Death Stranding proves to be successful there could be a
greater demand for story driven games and my focus as an artist could be
directed towards creating similar projects.
KOJIMA PRODUCTIONS (TBA) Death Stranding. [DISC, DOWNLOAD] Playstation 4. San Mateo: Sony Interactive Entertainment.
MAKUCH, P. (2017) EA Talks About Closing Visceral And Single-Player Games. [Online] Available from: https://www.gamespot.com/articles/ea-talks-about-closing-visceral-and-single-player-/1100-6454535/ [Accessed: 14/06/2018]
SHANLEY, P. (2018) 'Death Stranding': Hideo Kojima on Taking a "Different Approach to Single-Player Games" [Online] Available from: https://www.hollywoodreporter.com/heat-vision/death-stranding-hideo-kojima-casting-lea-seydoux-lindsay-wagner-1119548 [Accessed: 14/06/2018]
Showing posts with label Week 7. Show all posts
Showing posts with label Week 7. Show all posts
Friday, 6 July 2018

Thursday, 5 July 2018
Week 7 - Thursday: Lighting Experimentation
Lighting in Unreal Engine is an area that I have little confidence in. Whilst I understand the basic functions of the different types of lights and the other elements such as the skydome, there are some nebulous attributes that I am still struggling to understand. There are numerous values which can be edited within Unreal Engine and each one has a knock on effect that will determine how the final light bake will render. To make matters worse, I am stuck using an outdated version of the software so I am somewhat limited in how I approach lighting my environment. I am aware that later versions of the software have made improvements on the lighting aspect but for now I have to make do with what I've got.
To help me better understand the technical side of lighting scenes, I have been watching a series of video tutorials entitled "The Unreal Engine Lighting Academy". The author covers a variety of topics but one series I am particularly interested in, involves creating the lighting for a real time architectural visualisation scene:
The video strips out the default lighting of the engine and rebuilds all the elements again from scratch. Because of this I was able to gain a better understanding of what everything does in the engine as I put them back into the scene one at a time. Below you can see a new scene I created in Unreal Engine so that I could quickly test different lighting settings without waiting for lengthy bake times.

I wanted to see the effects of an HDRI lit skydome within an environment. I stripped out all the lighting elements and created a giant sphere within the scene. Following the video tutorial I found a good HDRI image and applied it to the sphere within the scene. What you see in the images here is the baked lighting from the HDRI skydome.

I like the subtle lighting the HDRI image is giving the environment. I think this will prove quite helpful for my main scene as the image itself would work as a nice backdrop for my mansion environment.

In the video tutorial, the author mentions that he is using a multi-bounce skylight plugin. The effect of which is to more accurately bake the lighting. Below you can see the effect of a single bounce compared to multiple bounces.


Originally Unreal Engine only allowed a single bounce for the skylight and I fear this may be true for the version I am using. I want the lighting bake to appear as realistic as I possibly can and may need to simulate these effects if need be, as I can't install custom plugins on the school machines.
51DAEDALUS. (2017) Unreal 4 Lighting Academy - Session 3.1 [Online Video]. 13th May. Available from: https://www.youtube.com/watch?v=pIbpHCtmDjo. [Accessed: 05/07/2018].
LUOSHUANG. (2015), Lightmass: multi-bounced sky lighting. [Online Image]. Available at: https://forums.unrealengine.com/development-discussion/rendering/112827-lightmass-multi-bounced-sky-lighting?140006-Lightmass-multi-bounced-sky-lighting=. [Accessed: 05/07/2018].
To help me better understand the technical side of lighting scenes, I have been watching a series of video tutorials entitled "The Unreal Engine Lighting Academy". The author covers a variety of topics but one series I am particularly interested in, involves creating the lighting for a real time architectural visualisation scene:
This is the eleventh video in a series on lighting environments within Unreal Engine. This video focuses on a lighting setup for an architectural visualisation scene.
The video strips out the default lighting of the engine and rebuilds all the elements again from scratch. Because of this I was able to gain a better understanding of what everything does in the engine as I put them back into the scene one at a time. Below you can see a new scene I created in Unreal Engine so that I could quickly test different lighting settings without waiting for lengthy bake times.

This is a new scene that I created with my own custom lighting setup.
I wanted to see the effects of an HDRI lit skydome within an environment. I stripped out all the lighting elements and created a giant sphere within the scene. Following the video tutorial I found a good HDRI image and applied it to the sphere within the scene. What you see in the images here is the baked lighting from the HDRI skydome.

This image shows only the results of the skylight I created. Take note of the soft shadows I was able to achieve.
I like the subtle lighting the HDRI image is giving the environment. I think this will prove quite helpful for my main scene as the image itself would work as a nice backdrop for my mansion environment.

The HDRI skysphere works as a nice background for the environment.
In the video tutorial, the author mentions that he is using a multi-bounce skylight plugin. The effect of which is to more accurately bake the lighting. Below you can see the effect of a single bounce compared to multiple bounces.

A lighting bake created in Unreal Engine that demonstrates the difference in lighting quality between a single bounce and multiple bounces from a skylight. On the left is the default value and on the right is the multi-bounced skylight.
I have cropped the image below to give a better look at the effect the multiple bounces is having on the scene.

Multiple bounces from the skylight cause indirect lighting to be reflected on surfaces.
Originally Unreal Engine only allowed a single bounce for the skylight and I fear this may be true for the version I am using. I want the lighting bake to appear as realistic as I possibly can and may need to simulate these effects if need be, as I can't install custom plugins on the school machines.
51DAEDALUS. (2017) Unreal 4 Lighting Academy - Session 3.1 [Online Video]. 13th May. Available from: https://www.youtube.com/watch?v=pIbpHCtmDjo. [Accessed: 05/07/2018].
LUOSHUANG. (2015), Lightmass: multi-bounced sky lighting. [Online Image]. Available at: https://forums.unrealengine.com/development-discussion/rendering/112827-lightmass-multi-bounced-sky-lighting?140006-Lightmass-multi-bounced-sky-lighting=. [Accessed: 05/07/2018].
Wednesday, 4 July 2018
Week 7 - Wednesday: Tutorial Feedback Using Polycount
Posting my work on Polycount
During the tutorial session my friend showed her work to the class and demonstrated how she had used Polycount to gather feedback from professional artists. My tutor recommended me to start doing the same as there are still some weeks remaining for the project, and this would give me time to take on feedback and make changes should I receive any.
I have often held off on posting works-in-progress online as I get worried people will judge my abilities based off of my unfinished pieces. On further consideration however I believe posting my progress on forums like Polycount is an important vector of dissemination. I will not only be able to receive valuable critique and exposure of my work to potential employers, but it will also force me to look at what other artists are working on and be mindful of how they are approaching projects. I believe this is all part of good networking practice and I want to start developing it seriously.
Update:
It looks like it's already working. I recieved a comment from a big inspiration of mine, B.O.W Qin:

B.O.W Qin's Artstation page is full of highly detailed mansion environments and this has been providing me with a trove of inspiration during my major project development:

I have been actively comparing my major project with Qin's work, so it is incredibly rewarding to have received acknowledgement from him. I will continue to post further updates on Polycount as my major project progresses.
During the tutorial session my friend showed her work to the class and demonstrated how she had used Polycount to gather feedback from professional artists. My tutor recommended me to start doing the same as there are still some weeks remaining for the project, and this would give me time to take on feedback and make changes should I receive any.
I have often held off on posting works-in-progress online as I get worried people will judge my abilities based off of my unfinished pieces. On further consideration however I believe posting my progress on forums like Polycount is an important vector of dissemination. I will not only be able to receive valuable critique and exposure of my work to potential employers, but it will also force me to look at what other artists are working on and be mindful of how they are approaching projects. I believe this is all part of good networking practice and I want to start developing it seriously.
Update:
It looks like it's already working. I recieved a comment from a big inspiration of mine, B.O.W Qin:

B.O.W Qin's Artstation page is full of highly detailed mansion environments and this has been providing me with a trove of inspiration during my major project development:

QIN, B.OW. (2017), Scene lighting test samples[UE4] [Online Image]. Available at: https://www.artstation.com/artwork/VKLYg [Accessed: 06/07/2018].
I have been actively comparing my major project with Qin's work, so it is incredibly rewarding to have received acknowledgement from him. I will continue to post further updates on Polycount as my major project progresses.
Tuesday, 3 July 2018
Week 7 - Tuesday: Bringing the Exterior into Unreal Engine
I have begun bringing the exterior of my environment into Unreal Engine. The majority of the assets all use either the brick material that I created or the grey limestone for the base. There are some elements that will require unique materials such as the triangular roof pediment.

You can see how I have applied the brick material to the walls. I have used parallax occlusion mapping to give them a bit of depth. I will be adding grime and other decals to the bricks to make it look less repetitive.

The environment is feeling very sterile and empty at the moment. I've decided to strip out all the lighting and placed a neutral light source in the scene, so that I can get a good sense of how all the materials will look without interference from strong contrasting light.

As you can see in these images there are still a lot of things that need to be brought into the engine. I am currently working on the roof at the moment. It is a high priority of mine to make it look as good as possible as it covers such a large area of the mansion.
Creating a Custom Roof Material
I have started to create a seamless roof material in much the same way that I created my bricks. I found this to be a good technique when creating my brick material because using real geometry lets you easily generate height maps, and these were very effective with parallax occlusion mapping.
Below you can see how I have lined up the tiles on a 2048 x 2048 plane so that the pattern repeats evenly:

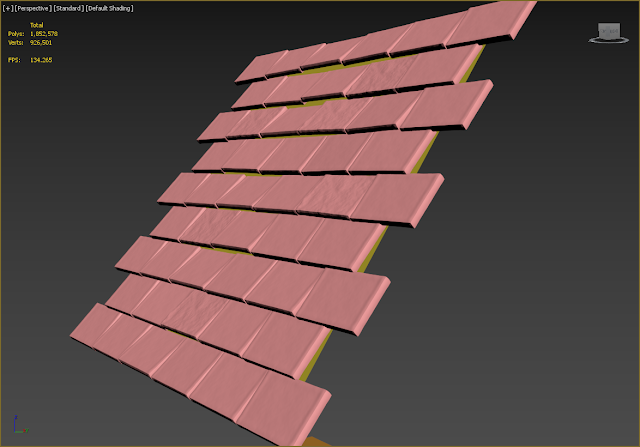
I've angled the tiles so that there will be some depth when it comes to the parallax occlussion mapping:
Here is the texture as it appears in Substance Painter:

I've baked the geometry onto the texture and now I need to hook it up in Unreal Engine. Once I have got the basic materials set up within my scene, I'm going to rebuild the lighting and do some experimentation to get everything looking the way I imagine.

The exterior face of the mansion in Unreal Engine.
You can see how I have applied the brick material to the walls. I have used parallax occlusion mapping to give them a bit of depth. I will be adding grime and other decals to the bricks to make it look less repetitive.

Close up of my brick material on the walls of the mansion.
The environment is feeling very sterile and empty at the moment. I've decided to strip out all the lighting and placed a neutral light source in the scene, so that I can get a good sense of how all the materials will look without interference from strong contrasting light.

As you can see in these images there are still a lot of things that need to be brought into the engine. I am currently working on the roof at the moment. It is a high priority of mine to make it look as good as possible as it covers such a large area of the mansion.
Creating a Custom Roof Material
I have started to create a seamless roof material in much the same way that I created my bricks. I found this to be a good technique when creating my brick material because using real geometry lets you easily generate height maps, and these were very effective with parallax occlusion mapping.
Below you can see how I have lined up the tiles on a 2048 x 2048 plane so that the pattern repeats evenly:

My roof tiles aligned to a 2048 x 2048 plane for easy texture tiling.
I've angled the tiles so that there will be some depth when it comes to the parallax occlussion mapping:

You can see how I have angled the tiles so that I get some depth with the height maps for the parallax occlusion mapping.
Here is the texture as it appears in Substance Painter:

The roof tile texture in Substance Painter.
I've baked the geometry onto the texture and now I need to hook it up in Unreal Engine. Once I have got the basic materials set up within my scene, I'm going to rebuild the lighting and do some experimentation to get everything looking the way I imagine.
Monday, 2 July 2018
Week 7 - Monday: Custom Brick Texture
I have started bringing the external features of my mansion into Unreal Engine. I decided as I was doing so to try and create my own brick material for use on the exterior walls of the mansion. I was inspired by some custom materials that 3D game developer Mark Ranson has been posting on his Artstation page, which he created by baking high poly geometry down into a tileable texture.
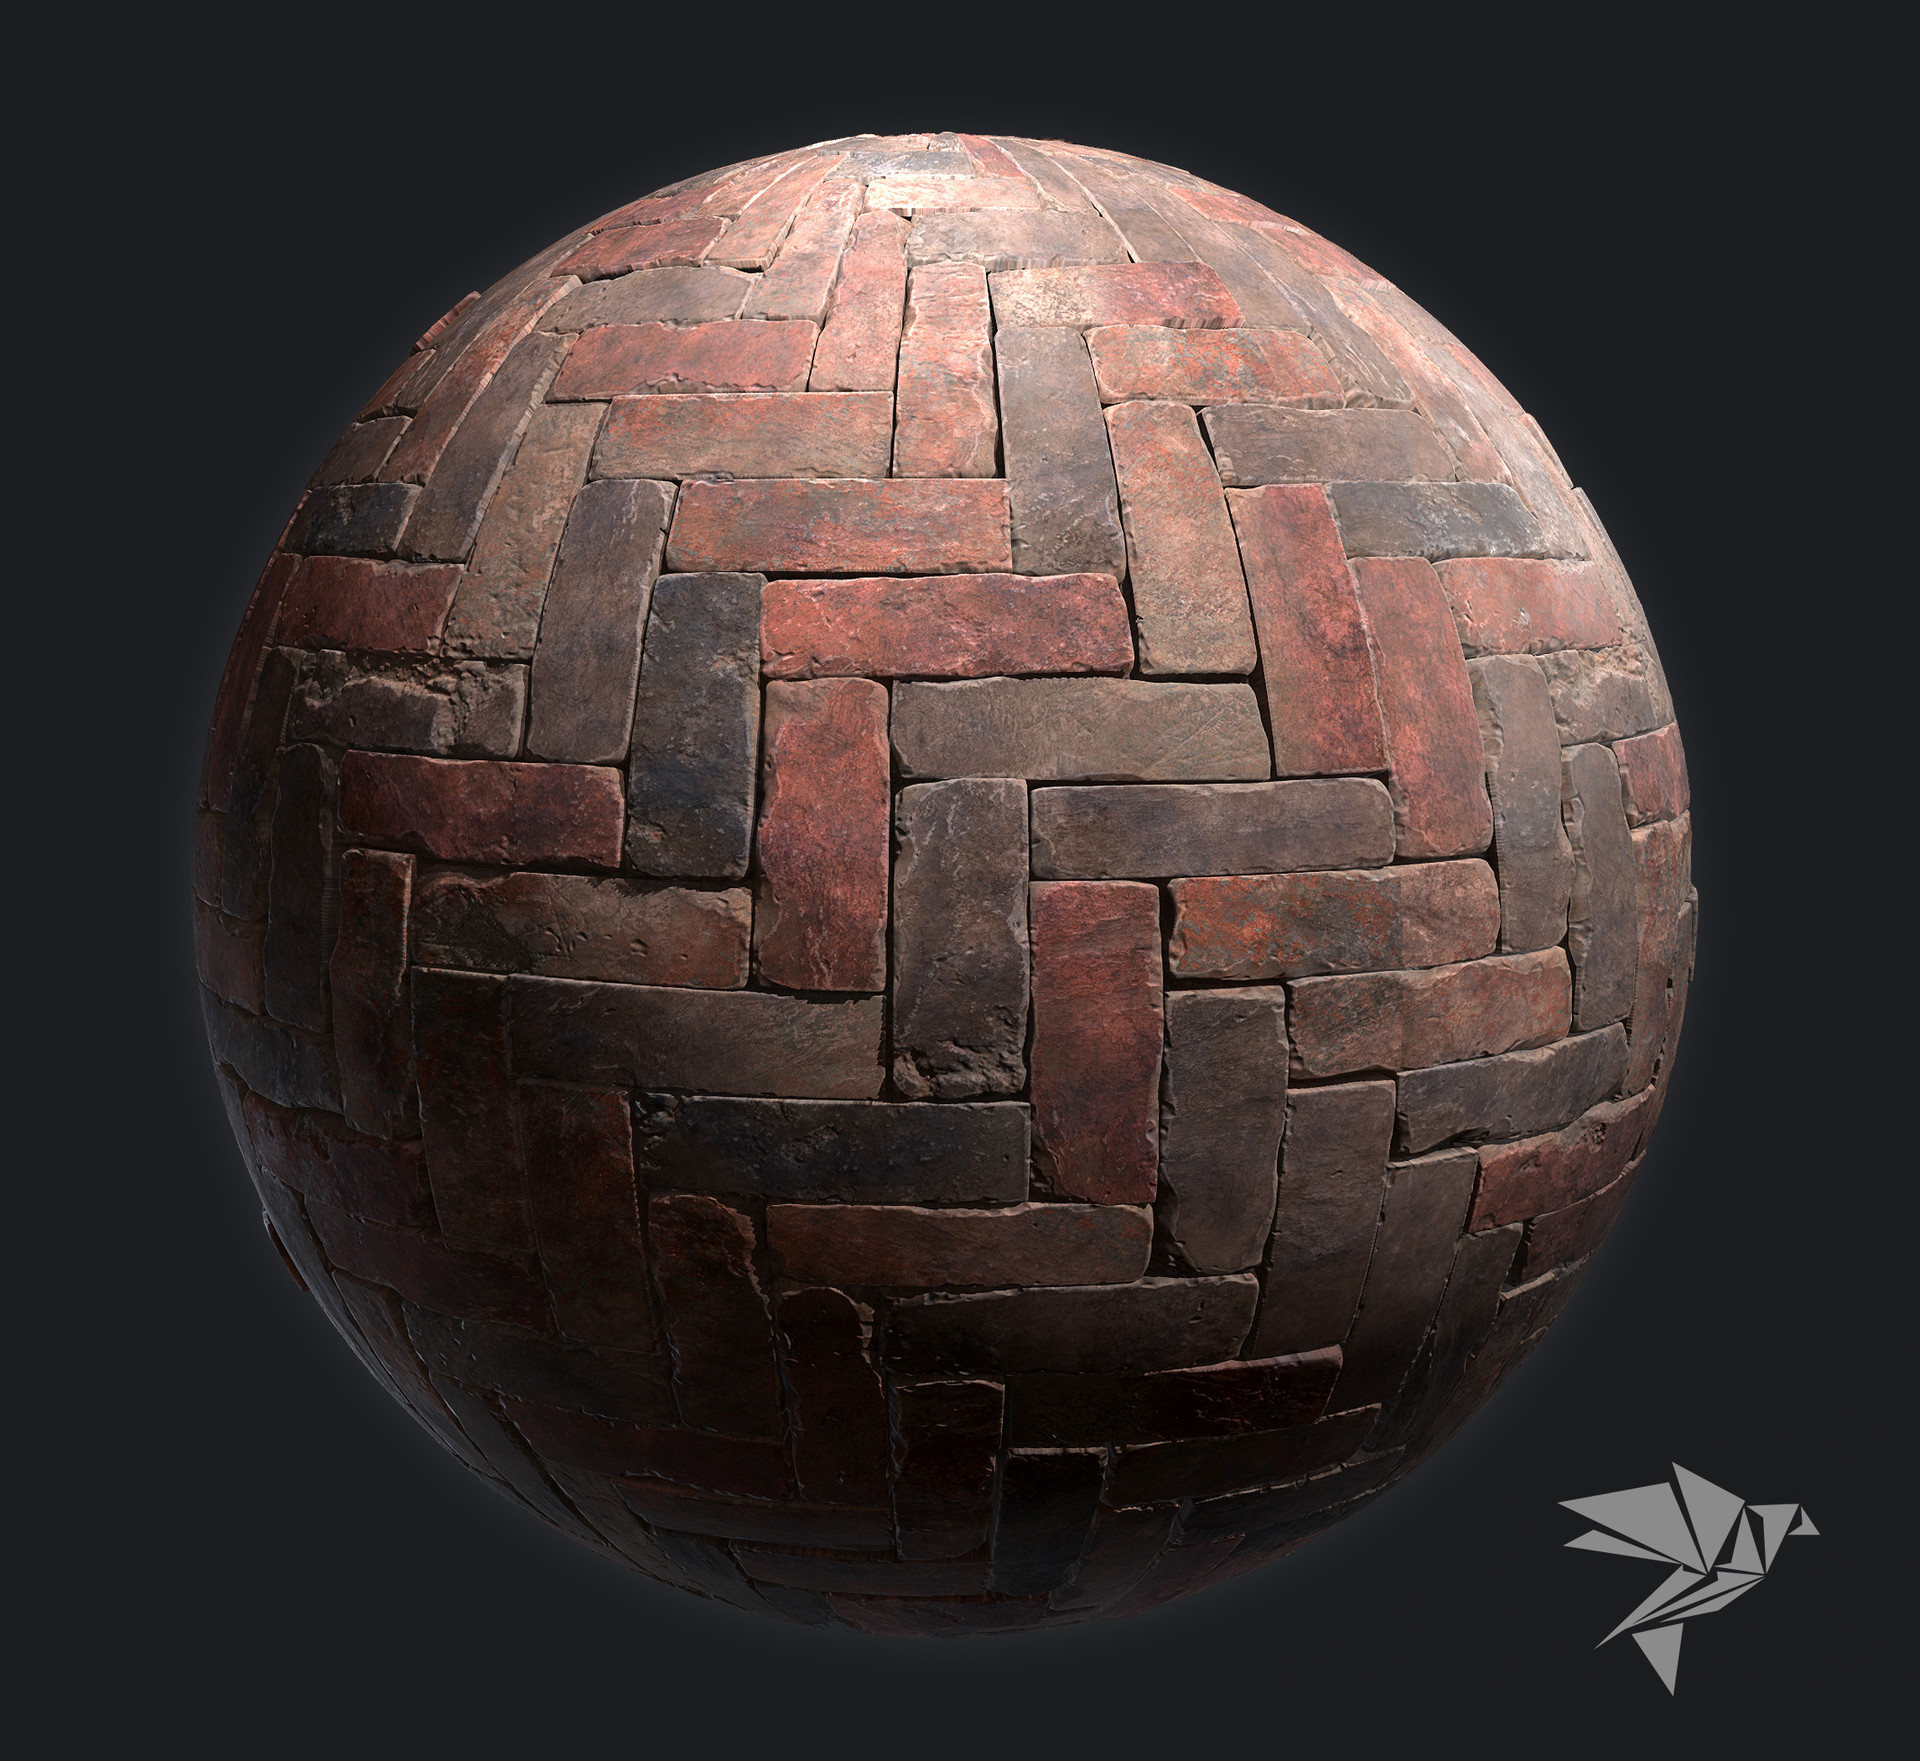
I felt it would be very useful to try doing this for myself, as I would be able to create the brick material to my own specification rather than rely on Google images and hope that it would have what I was looking for.
I started by creating a single brick model and tessellating the mesh so that it was dense enough to start adding details. I then stacked some editable modifiers onto the mesh so that I could add differentiation to each individual brick and avoid obvious tiling.

Once the brick setup was complete, I created a 2048 x 2048 plane and subdivided it evenly so that I could accurately space the bricks across it:

I then rotated some of the bricks to create a little more variation in the pattern, as I felt it would look strange if they were aligned perfectly with one another:

I then exported the 2048 x 2048 plane into Substance Painter and baked the high poly geometry onto it. You can see that the bake still looks rather flat. I intend to add parallax occlusion mapping as Mark has done with his material to help add some height to the texture.

I added some standard Substance Materials to the texture and painted some of the bricks a slightly different colour to make it look more varied. I ended up toning this done however as it made the texture look very repetitive when it was tiled over a large surface:

Once I was happy with the look of the material I loaded it into Unreal Engine. I was pleased that I succeeded in creating a completely seamless texture but I am worried it will look unrealistic if it covers such a wide area:

I have tried to make the tiling less noticeable by placing columns in front of open areas. So far I haven't applied the parallax occlusion mapping to the material yet and this may help to break it up further.

As a test I think this was a successful exercise. I was able to create a seamless texture in a relatively short amount of time and should I need to do something similar again in the future, I know I can rely on this method.
Whilst the technique is sound, I think that the overall appearance of the material needs improvement. When comparing this material to something created using photogrammetry techniques, mine looks very fake. I would like to start blending this material with dirt and decals in Unreal Engine to help ground it in some realism.
RANSON, M. (2018). High-Quality PBR Industrial Herringbone Brick [Online Image]. Available at: https://www.artstation.com/artwork/59X1A [Accessed: 02/07/2018].
Mark Ranson's brick material inspired me to create my own.
I felt it would be very useful to try doing this for myself, as I would be able to create the brick material to my own specification rather than rely on Google images and hope that it would have what I was looking for.
I started by creating a single brick model and tessellating the mesh so that it was dense enough to start adding details. I then stacked some editable modifiers onto the mesh so that I could add differentiation to each individual brick and avoid obvious tiling.

My brick model with added noise and displacement modifiers to help vary its shape.
Once the brick setup was complete, I created a 2048 x 2048 plane and subdivided it evenly so that I could accurately space the bricks across it:

By spacing the bricks evenly across this plane I intended to create a completely seamless texture.
I then rotated some of the bricks to create a little more variation in the pattern, as I felt it would look strange if they were aligned perfectly with one another:

The rotated bricks add some further variation to the pattern.
I then exported the 2048 x 2048 plane into Substance Painter and baked the high poly geometry onto it. You can see that the bake still looks rather flat. I intend to add parallax occlusion mapping as Mark has done with his material to help add some height to the texture.

A flat plane baked with the normal maps generated by the brick pattern that I made.
I added some standard Substance Materials to the texture and painted some of the bricks a slightly different colour to make it look more varied. I ended up toning this done however as it made the texture look very repetitive when it was tiled over a large surface:

The painted texture in Substance Painter.
Once I was happy with the look of the material I loaded it into Unreal Engine. I was pleased that I succeeded in creating a completely seamless texture but I am worried it will look unrealistic if it covers such a wide area:

My seamless brick texture as seen in Unreal Engine.
I have tried to make the tiling less noticeable by placing columns in front of open areas. So far I haven't applied the parallax occlusion mapping to the material yet and this may help to break it up further.

The brick material applied to an external wall.
As a test I think this was a successful exercise. I was able to create a seamless texture in a relatively short amount of time and should I need to do something similar again in the future, I know I can rely on this method.
Whilst the technique is sound, I think that the overall appearance of the material needs improvement. When comparing this material to something created using photogrammetry techniques, mine looks very fake. I would like to start blending this material with dirt and decals in Unreal Engine to help ground it in some realism.
RANSON, M. (2018). High-Quality PBR Industrial Herringbone Brick [Online Image]. Available at: https://www.artstation.com/artwork/59X1A [Accessed: 02/07/2018].
Subscribe to:
Posts (Atom)