I first went back to 3DS Max and created some planes that were mapped with a leaf texture. What you see in the images below are the leaf planes with their alpha masks displayed:
Two types of vines I created to put in my environment. One is a generic vine card that I can repeat throughout my scene and the other is a specific piece that I can use to hang over the balcony in the entrance hall.
For my leaf planes I have added some edge loops so that I can animate the leaves slightly in Unreal Engine. This also gives the leaves some better definition as curving the planes makes it easy to see the leaves from multiple angles in the engine.
A close up of my leaf planes with alpha masks displayed.
I used real geometry from the vine decal that I had created to help me align the leaves. Using the align spacing tool I was able to quickly create a spline path and then make my leaves follow it just as I had done with the pattern on my rug asset.
The leaves following the paths I created. The vine geometry will not be used in the engine only the leaves and the larger plane.
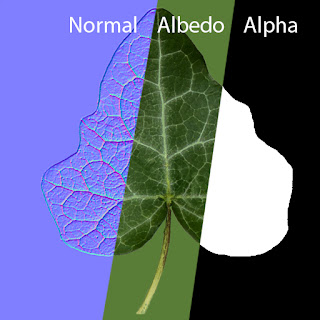
Below you can see the texture maps I created for the individual leaves:
The normal, albedo and alpha maps for the leaf.
When taken into Unreal Engine the vines look like this:
The vine model in Unreal Engine.
I have used my original alpha mask from the vine decal to cut out the plane. Using parallax occlusion mapping I was able to give some further depth to the cut out vine texture. The leaves are using their own material as you can see in the image above.
Below you can see the effect of all the vines clustered together in the scene:
Multiple vines placed together to create the ivy on the house.
I think these are looking much better than what I had before. Bringing some greenery into the interior is also going to help make the environment pop. In terms of my criteria for determining my colour palette, I think the inclusion of the colour green is going to emphasise that nature is slowly taking over the mansion.


No comments:
Post a Comment