Showing posts with label Week 3. Show all posts

Friday, 8 June 2018

Week 3 - Forefront Friday: The Artwork of Jonas Ronnegard

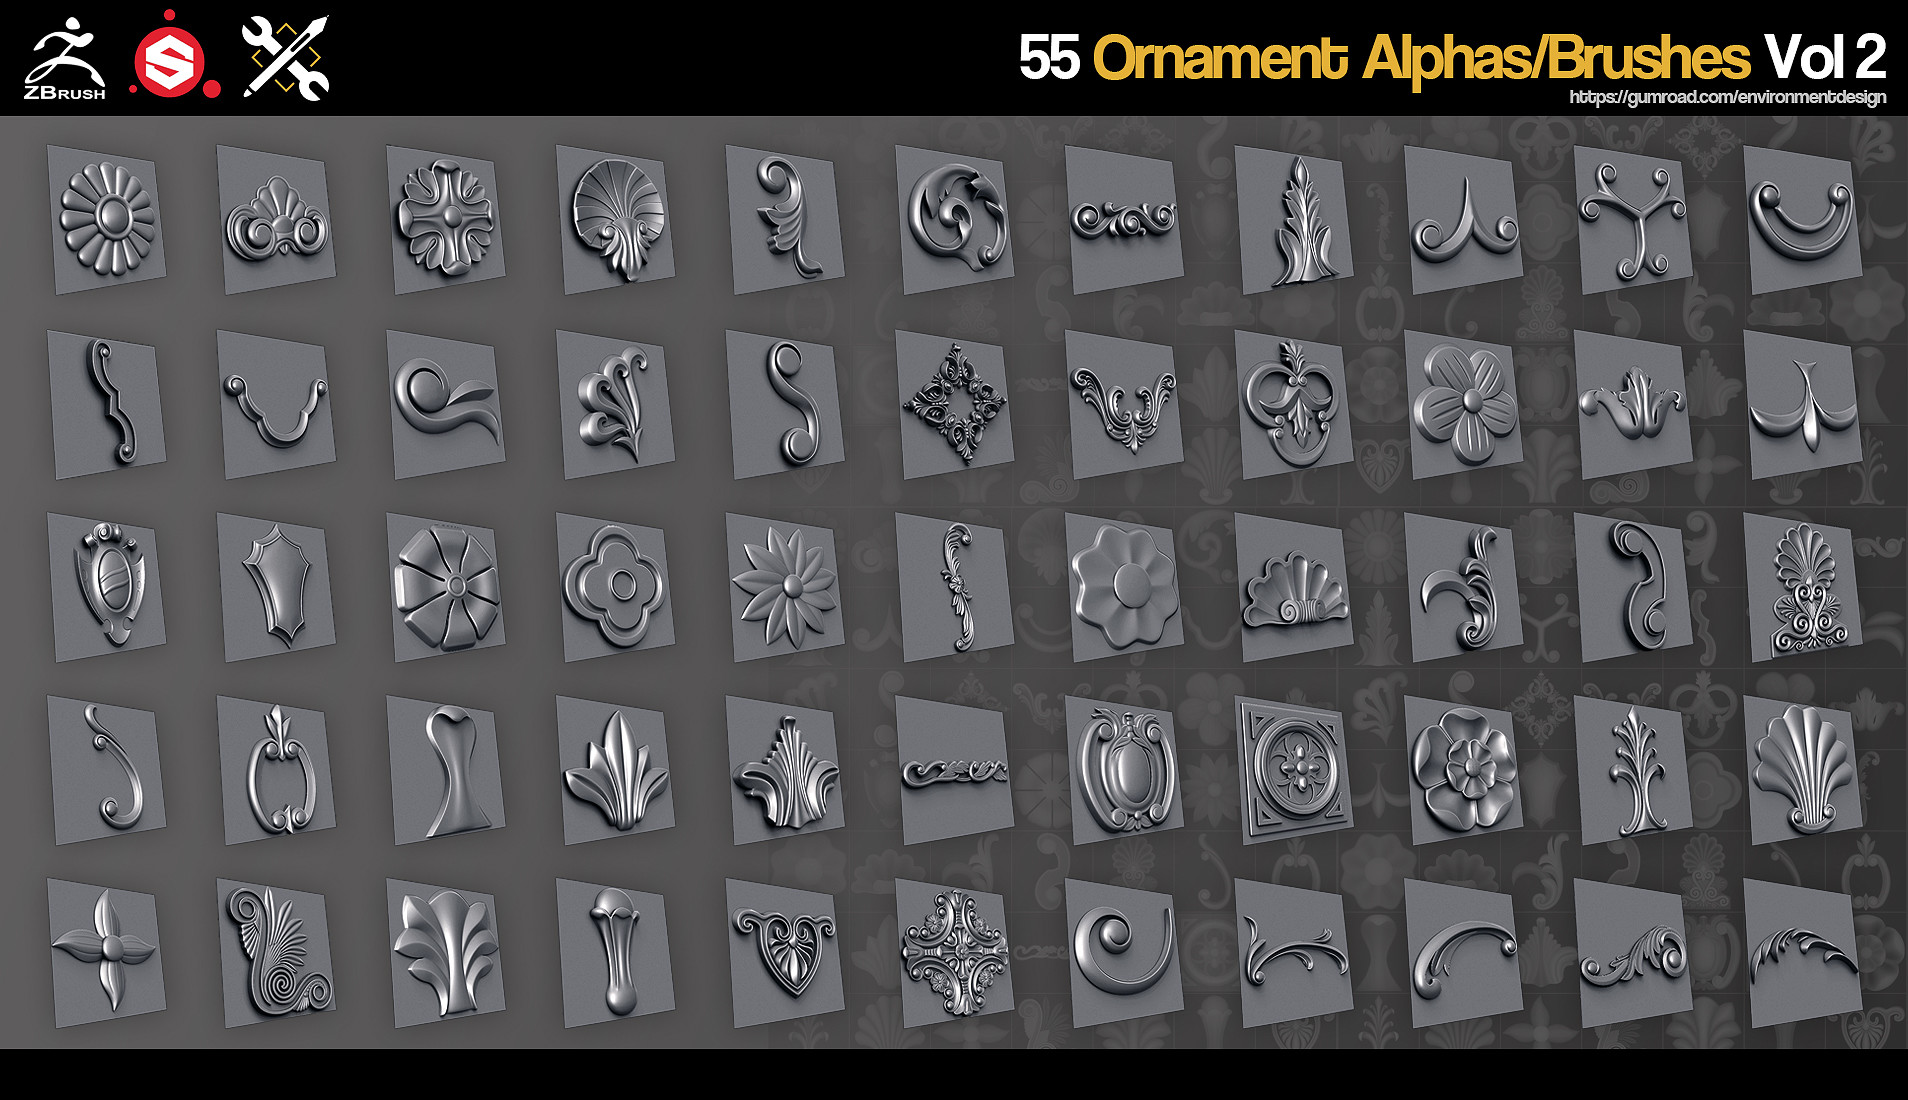
Jonas Ronnegard is a freelance environment artist who has built an arsenal of tools and resources for other artists to purchase. I was very impressed with his portfolio on Artstation and one video in particular, where he demonstrates the effectiveness of his ornamental brushes in ZBrush made my jaw drop. 

You can watch the video here at: https://www.youtube.com/watch?time_continue=119&v=dNUHjB4YK5c

https://cdnb.artstation.com/p/assets/images/images/007/197/755/large/jonas-ronnegard-main03.jpg?1504387560
A selection of the alpha brushes that Jonas has created.

This is honestly why I need to start using ZBrush as Jonas showcases with ease how quickly he was able to create ornate details and then texture them in Substance Painter. When it comes to my own workflow I spend a lot of time carefully positioning details within 3DS Max and then exporting them for hard surface transfer. Whilst I feel I have gotten the workflow down, when compared to the cutting edge brush details created by Jonas, I obviously could be a lot faster in this area. For me this seems the quickest way to simulate details because when I start to use a lot of high poly models in my 3D scenes the computer performance starts to struggle. This is a problem not present in ZBrush as the software can display an incredibly high amount of polygons without performance loss.

Studying Ronnegard's portfolio I can already see areas that I need to improve in such as organic modeling. As an environment artist I need to make sure I am capable of both hard surface and natural details. Currently my portfolio leans very heavily toward architectural models and if I am to reach the high standards set by Jonas Ronnegard, I will need to prove that I can diversify whilst retaining a consistent quality throughout my work.

RONNEGARD, J. (2017). JRO - 55 Ornament Brushes/Alphas Vol 2. [Online Image] Available at: https://www.artstation.com/artwork/5ggxA [Accessed 08/06/2018].

JROTOOLS. (2017) Ornament Alphas/Brushes Vol 2 - Preview. [Online Video] September 5th. Available from: https://www.youtube.com/watch?time_continue=119&v=dNUHjB4YK5c [Accessed: 08/06/2018]

Thursday, 7 June 2018

Week 3 - Thursday: Grandfather Clock

A big source of inspiration for me is the work of artist Joel Zakrission from DICE game studios. Joel has lots of intricately modelled assets on his Artstation all of which are extremely high quality.

https://cdnb.artstation.com/p/assets/images/images/003/120/839/large/joel-zakrisson-mansion4.jpg?1469958977
ZAKRISSON, J. (2017). Mansion Hall. [Online Image] Available at: https://www.artstation.com/artwork/deoLe [07/06/2018].

I think his mansion environment is fantastic as it features so many varied assets that really help bring the scene to life. I particularly like the grandfather clock so I went about creating one for my scene.

Here's the model as seen in 3DS Max:

My grandfather clock asset. From left to right: the low poly, wireframe and high poly model.

For the clock face I reused the swirly decals that I had modelled for other assets like the fireplace and the sconce:

The high poly clock face.

I used material ID masks in Substance painter to help me quickly apply a metallic gold material onto the swirly details. In the images above notice that the details on the high poly models are all an orange colour. This was how I generated the material ID's for the texture.

You can see how the finished asset looks in my Unreal Engine scene below:


Currently I feel that some elements of the clock still need work. The clock hands seem far too dark and I can't see any ot the detail on them. I also feel that lighting my scene effectively will be crucial in getting comparable results to Joel Zakrisson, as he has used a complimentary blue light to add some contrast to his scene.

I think the asset is a success from a technical standpoint as it has a very low polycount and readable silhouette. In fact I probably could have gotten away with using more polygons if I wanted, as it is a hero asset that will only feature once in the environment.

I used this as test to see if I could create a high poly game ready asset. I intend to make several more assets of this quality to give myself a greater chance of employability by diversifying my portfolio.

Wednesday, 6 June 2018

Week 3 - Wednesday: Tutorial 2

Based on the feedback that I received from my tutorial session this week, I have tried to improve my online portfolio by making it easy for potential employers to navigate. I realise that before it wasn't obvious as to which project was using real-time graphics and which ones were pre-rendered. I have added icons to my project thumbnails to make things a little less confusing:

My updated Artstation portfolio.

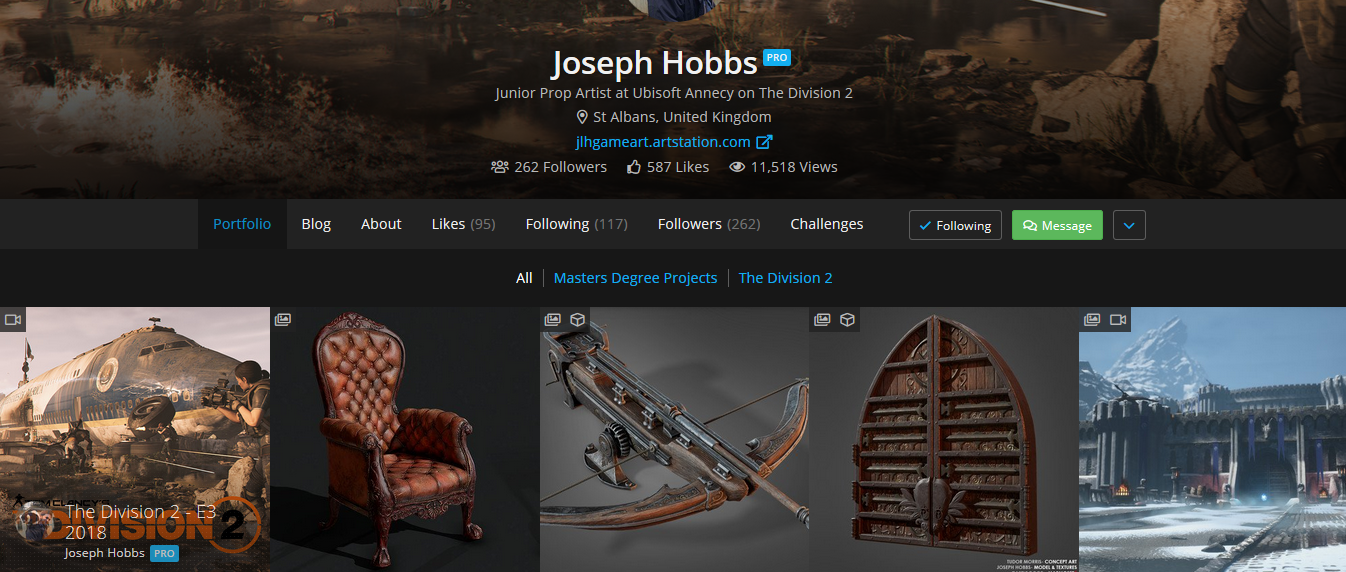
I am going to be applying for jobs this month and I want to ensure that my online portfolio is ready. Based on other feedback I will be adding some more pieces that show off individual assets. Similar to artists like Joseph Hobbs, who was a student last year. He has included some pieces on his Artstation page that showcase individual high quality assets.

 Joseph's portfolio has a strong presence of high quality assets that show he can create game ready props as well as environments.

I feel that if I include these in my portfolio as well it will show that I can model props that adhere to industry practice, something that my current portfolio isn't doing at the moment.

JOSEPH, H. (2018) Artstation - Joseph Hobbs. [Online] Available from: https://www.artstation.com/jlhgameart [Accessed: 06/06/2018]

Tuesday, 5 June 2018

Week 3 - Tuesday: Completed Entrance Hall

I have finally completed the modeling for the entrance hall area. I have created a render in 3DS Max and hidden some of the walls so you can see inside better:

A render of my entrance hall interior.

The next phase will be to UV map some of the more complicated features and ensure that everything goes into the engine correctly.

With the entrance hall area I have tried to conform to the requirements of Unreal Engine 4. As such when I bring this geometry into the engine, I will need to make sure that the elements are brought in efficiently. To illustrate what I mean, I have taken the time to break down this area into how I want to bring the assets into the engine. By doing this I hope to ensure that my assets are fit for purpose within Unreal Engine, making it easier for me to work with all of the 3D elements that I will be using.

A breakdown I created to help me bring my assets into Unreal Engine.

I have categorised my assets into three types:
  • Individual assets: These are the models that will come into the engine as separate entities. For example I am keeping the bannister posts individual assets because it's easier to position them without error in 3DS Max first.
  • Repeated assets: These are models that I can easily repeat in Unreal Engine without error. I will only import one of this type and then position it repeatedly in the engine.
  • Single asset: This represents a complex set of models that I will be importing into the engine as a single asset for easy placement.
Because of the complex shape of this room, I haven't used modularity with some of the assets. Making each bannister post an individual asset for example is highly problematic as I have what could be just a single asset being imported into the engine multiple times. The awkward layout of the entrance hall has made it quite difficult to use modularity in this case and whilst I acknowledge this is inefficient, I don't want to risk having any noticeable gaps in the balcony railings. Other assets are more forgiving however and I think I can position these in the engine without any problems.

The majority of the surfaces in the entrance hall are wooden, so I already have my material instance setup to make the texturing process quick. The next task will be to ensure that everything is imported into the engine correctly so that I can finish the first room of my environment.

Monday, 4 June 2018

Week 3 - Monday: Stairway Rug

I have been looking at some other game environments with a similar theme to my project and found this piece by artist Zack Parkinson:

PARKINSON, Z. (2017). Abandoned Scottish Manor. [Online Image] Available at: https://www.artstation.com/artwork/BDXzl [04/06/2018].

I feel that the ruffled carpet on the stairway gives a lot of credibility to Zack's environment because it is slightly messy, which adds a touch of realism to the scene. I was curious about how he went about creating this asset and I found this article from 80 Level.com which provided a lot of helpful information on how Parkinson created his environment.

80 LEVEL (2017) Tips and Tricks of 3d Interior Production. [Online] Available from:
https://80.lv/articles/tips-and-tricks-of-3d-interior-production/ [Accessed: 04/06/2018]

Zack stated that he used Marvelous Designer to create the folds of his carpet. Unfortunately I didn't have access to this software, so I ended up creating my stairway carpet entirely within 3DS Max. I still used the ProOptimiser modifier that he suggested to reduce the poly count at the end. My method had the drawback of not being able to create the final UV map first as I wasn't simulating fabric but manually creating the folds onto the geometry myself. This was a time consuming method but I did come up with some creative solutions to speeding the process up a bit. In future I would like to invest in learning Marvelous Designer as any tool that can make my workflow more efficient will always be worth it in my opinion.

I started by extruding the faces of my existing stairway and adding cuts along the surface of the faces. Adding additional edges will cause the geometry to "tighten" in those areas when smoothed. You can see the results of this in the image below:

The folds in the geometry were modelled manually and then smoothed out using the Turbo Smooth modifier.

On the left hand side is the model with the additional edges that I added to create the appearance of fabric. On the right side is the model once it has been smoothed with the Turbo Smooth modifier. You can see this is quite a simple way of adding creases to geometry. A benefit to this method is that I had complete control of where I wanted the creases to appear, something that simulations don't always give you.

The finished carpet.

Once the model has been smoothed, the resulting polygon count of the geometry is very expensive:

The wireframe view of the high poly model.

The folded details at the end of the carpets were simulated using the Cloth modifier in 3DS max. I chose to simulate these details instead of modelling them as I had done for the smaller creases on the steps. I felt as these folds were going to be far more complex, it would be easier to get a realistic looking result by using the Cloth simulation rather than modelling them myself. I created a new poly plane and applied the Cloth modifier alongside a series of collision objects for the cloth to interact with. You can see the simulation below:

An animation of my cloth simulation in action.

Once the simulation was complete and I was happy with how the folded fabric looked, I then converted the plane into an editable poly and stitched it together with my main carpet model. Once it was attached I then turbo smoothed the geometry and added the Shell modifier to give some thickness to the carpet:

The completed carpet combined with the folded cloth simulation.

With the high poly model completed I then added the ProOptimiser modifier to greatly reduce the polycount of the model:

Creating a low poly carpet by using the ProOptimiser modifier. You can see how the mesh has been converted into triangles making it ideal for game engines.

I may have perhaps reduced the details of the carpet too much, as I now have a lot of ugly jagged edges. I wasn't sure if I could get away with more polygons for a single asset when it was already quite heavy to begin with. If I were to do this again I probably would increase the poly count, as visual quality is more important for this project then whether the thing is optimised well. Zack Parkinson seemed to keep his carpet quite high poly to preserve the details and this is something I wished I had done as well:

PARKINSON, Z. (2017). ProOptimizer - Preserve UV's. [Online Image] Available at: https://80.lv/articles/tips-and-tricks-of-3d-interior-production/ [04/06/2018].

With the low poly model complete, I created my UV maps and exported both the high poly and low poly models into Substance Painter for normal detail and ambient occlusion baking. You can see the base colour, normal value and ambient occlusion pass on the texture below:

The results of baking the high poly model onto its low poly counterpart in Substance Painter.

I looked at some images of stair carpets online and wanted to add some additional details to the texture such as a pattern running along the edges of the carpet. To do this would be a little tricky as I would need the pattern to adhere to the folds of the fabric in order to maintain realism. I started by selecting one of the ornate details that I had made earlier to use for my pattern:

The detailed 3D model I chose to use as the trim pattern on my carpet.

Once I had my details selected I used a feature within 3DS Max called the Align Spacing Tool. This lets you select geometry and make it follow along a spline path:

Taking a model and making it conform along a spline.

You can see this was a helpful tool for creating a pattern for the edge of the carpet:

The model following the spline path. I can increase the amount of times the pattern repeats along the selected path if I wish.

I exported my baked texture from Substance Painter and applied it to a square plane within 3DS Max. This enabled me to trace out a spline path along the edges of the carpet. The spline paths are represented by the thick white lines:

Creating spline paths along the edges of my carpet.

Below you can see the pattern following along the spline path:

My 3D model has been applied to the spline paths along the edges of my carpet texture.

Because these are all 3D models, I then had to turn them into a texture so that I could apply the pattern to my material in Substance Painter.

The pattern is comprised of hundreds of 3D models and needs to be turned into a texture.

Once the pattern was finished I then rendered the scene from a top-down orthographic view in 3DS Max. I then took the render into Photoshop and created this alpha mask for the pattern that I could use in Substance Painter:

I created this alpha mask from my render in 3DS Max.

This let me add my pattern to my material in the precise location that I wanted it. Once the alpha mask was in Substance Painter it was a quick process to create the final look of the material. You can see the finished stairway rug below:


Here's how it looks in the scene so far:


Overall I am quite pleased with the asset. There are still a few things I am going to change such as the underside of the carpet which looks a bit strange when you are close to it in the engine. I will be aiming to add more assets like this to the environment as I feel the 'messy' look of the carpet helps to show that the mansion is abandoned.

Whilst it did take a long time to setup, I do think the results of my technique were successful. However if I can save time I would still like to learn how to use Marvelous Designer as I cannot afford to spend this amount of time on every asset in my scene.

I'm going to be using 80 Level a lot more from this point onward as they have lots of helpful level breakdowns that I would like to reference to help me get better as an environment artist and perfect my workflow.