Tuesday, 31 July 2018

Week 11 - Tuesday: Interview with Playground Games

I've just gotten off a skype interview with Don Arceta the lead environment artist at Playground Games. I received some feedback on my major project environment that I will be adding to my Unreal Engine scene. The main points of critique were for the floor in the hallway, that he said looked far too rough, and that the walls that could perhaps have the imprints of where portraits used to hang on them.

One of the shots that I recieved feedback on.

I enjoyed the interview and have taken this as an opportunity to improve my handling of a professional interview setting. I was somewhat nervous but I tried to prepare for the interview by gathering as much information that I could, to answer any questions he may have had about my work. I was asked to reflect on what I felt was my weakest and strongest areas, but fortunately this question did not catch me off guard as I have been reflecting on these very things as I write my blog.

I was complimented on my work and Don said he was loving my environment so far. I asked questions about where I would fit within the company and was told it would be somewhere within the asset team. To my surprise however I was told that most of the 3D modelling was outsourced to a third party. I found this a shame because this is my favourite part of the process. For my career I would ideally like to be one of the people creating the 3D assets, so I will be continuing to apply for other opportunities in addition to this.

Whilst this may not lead to anything, I am confident that my work can stand up to scrutiny. I look forward to completing this project so that I can fully display it on my Artstation page. I only showed Don work-in-progress screenshots on the Polycount forums so I am eager to finish this and show it off properly.

Monday, 30 July 2018

Week 11 - Monday: Project Recap

At the start of week eleven I feel my environment is really starting to come together. I have imported the majority of my assets and have got the lighting to where I want it to be. The remaining steps will be to improve the foliage on the exterior and hopefully bring some inside as well.

The entrance hall.


View of the hallway.

 View of the first floor balcony.

 In the hallway looking out towards the entrance hall.

The exterior still needs a lot of work as this is where most of my foliage will be seen. I am hoping to bring some greenery to the main entrance hall as well because this will add some nice contrasting green light to the interior.

Friday, 27 July 2018

Week 10 - Forefront Friday: The Artwork of Walid K-Perrussel

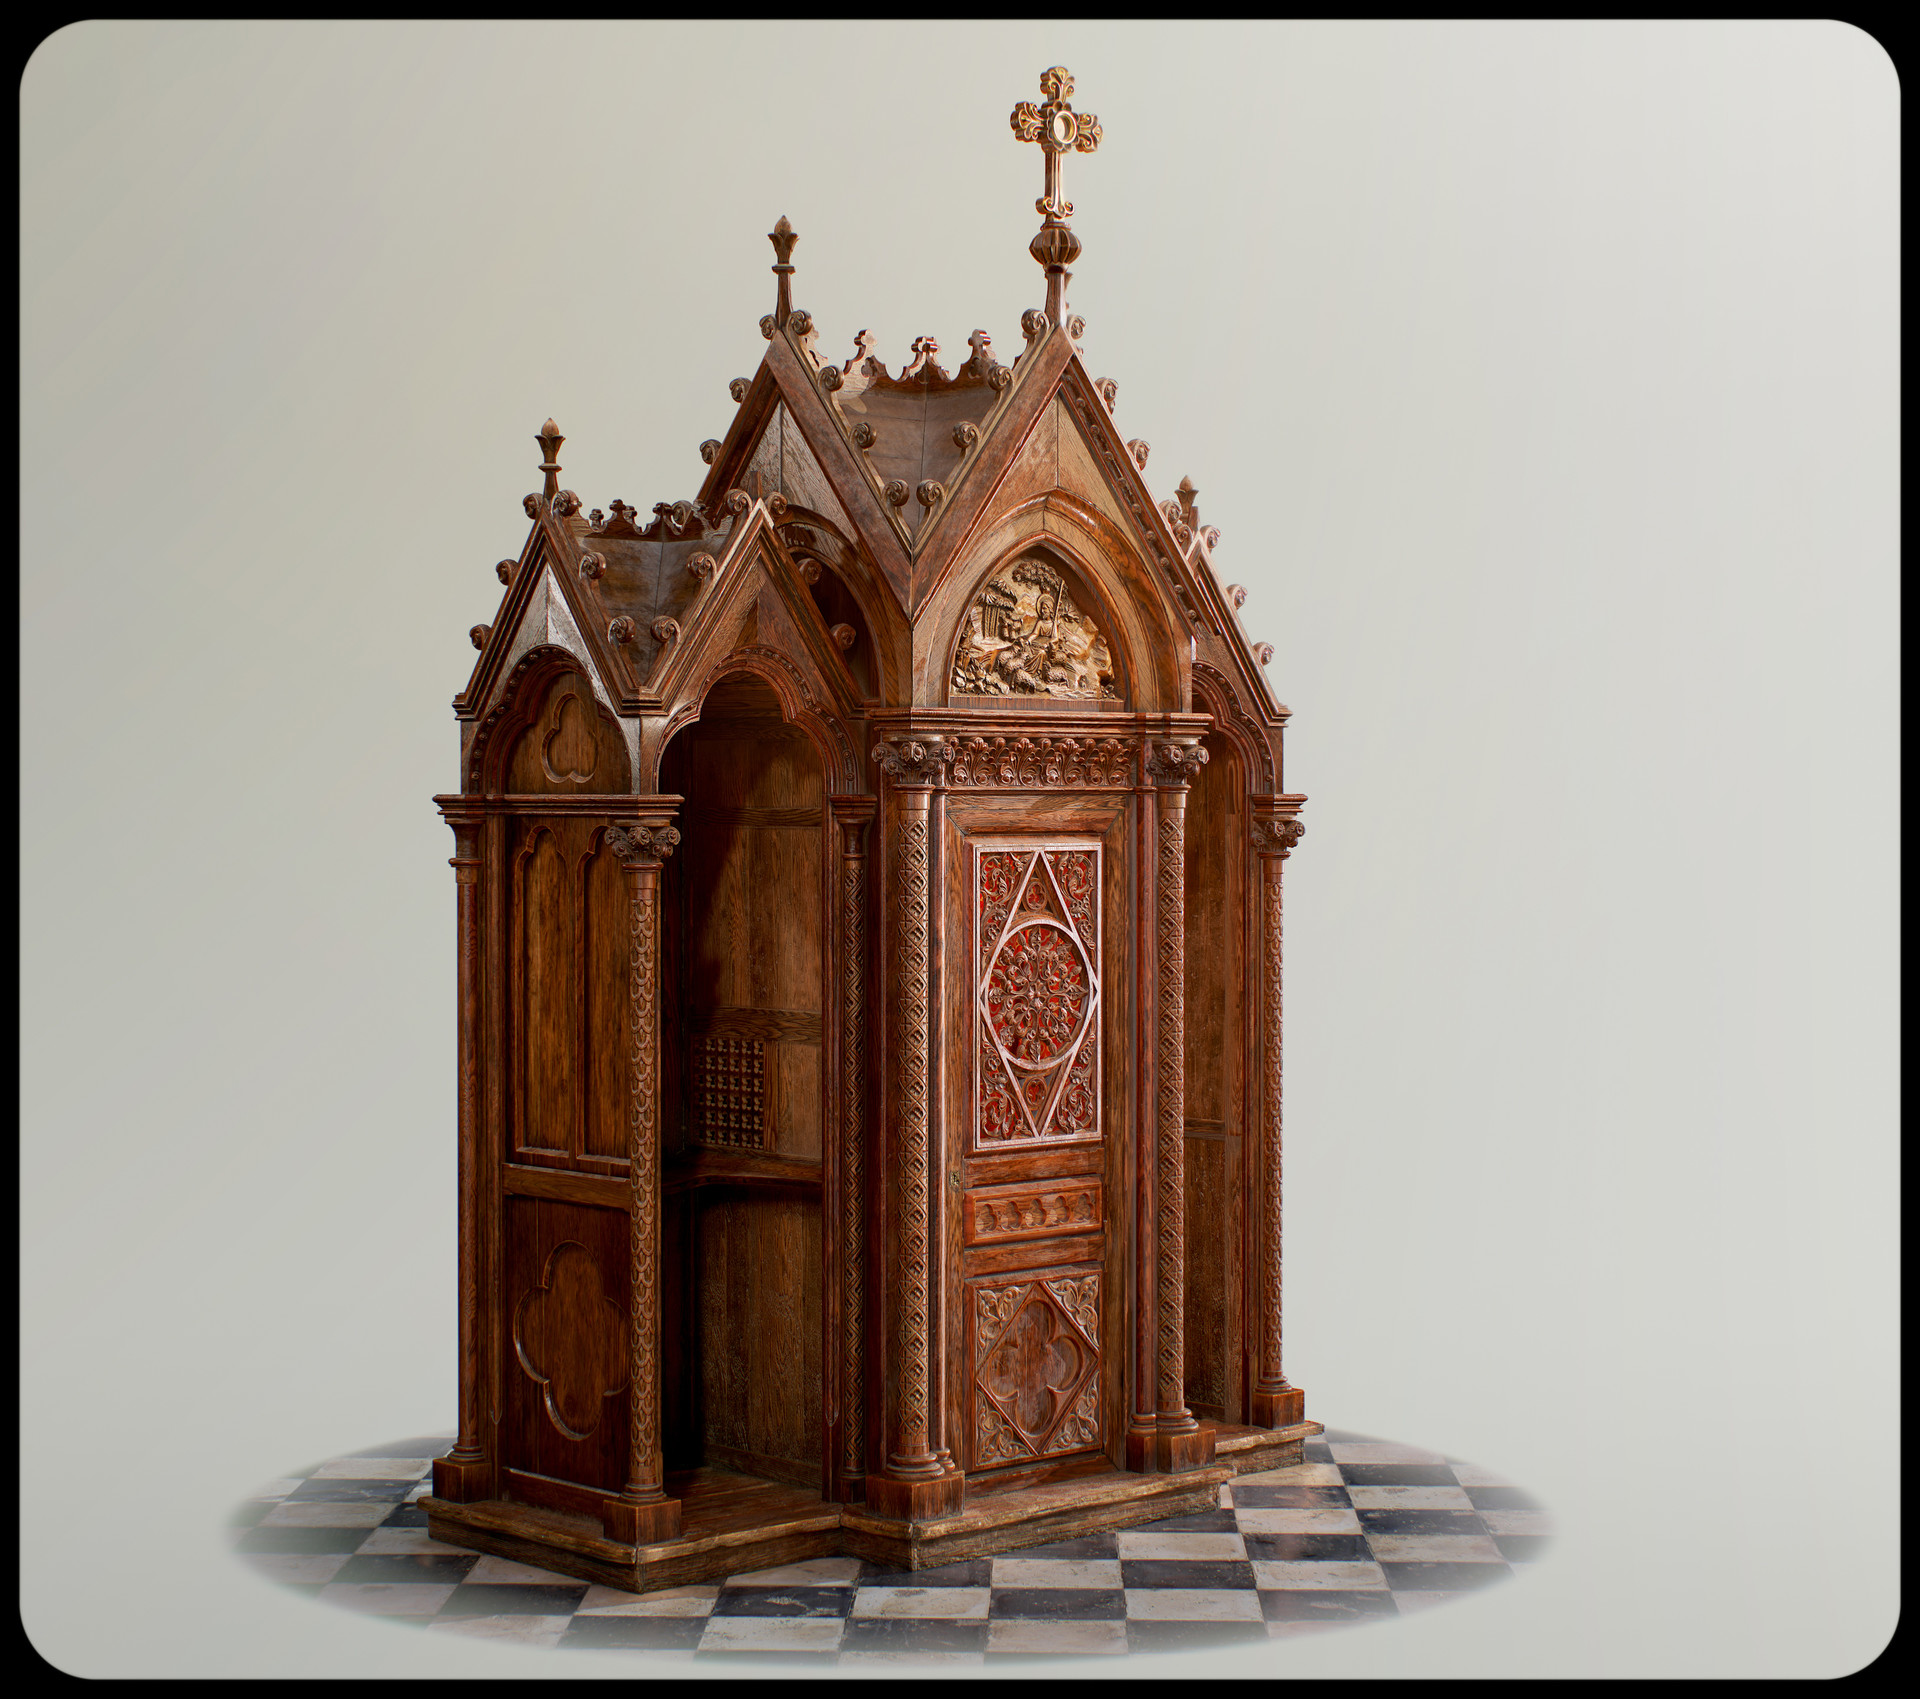
This week I have been studying the artwork of environment and prop artist Walid K-Perrussel. I was browsing Artstation looking for inspiration when his highly detailed model of a gothic confessional caught my attention.

https://cdna.artstation.com/p/assets/images/images/011/732/852/large/walid-k-perrussel-theconfessionnal-full.jpg?1531132821
K-PERRUSSEL, W. (2018), Gothic Confessional. [Online Image]. Available at: https://www.artstation.com/artwork/Jxz6R [Accessed: 27/07/2018].

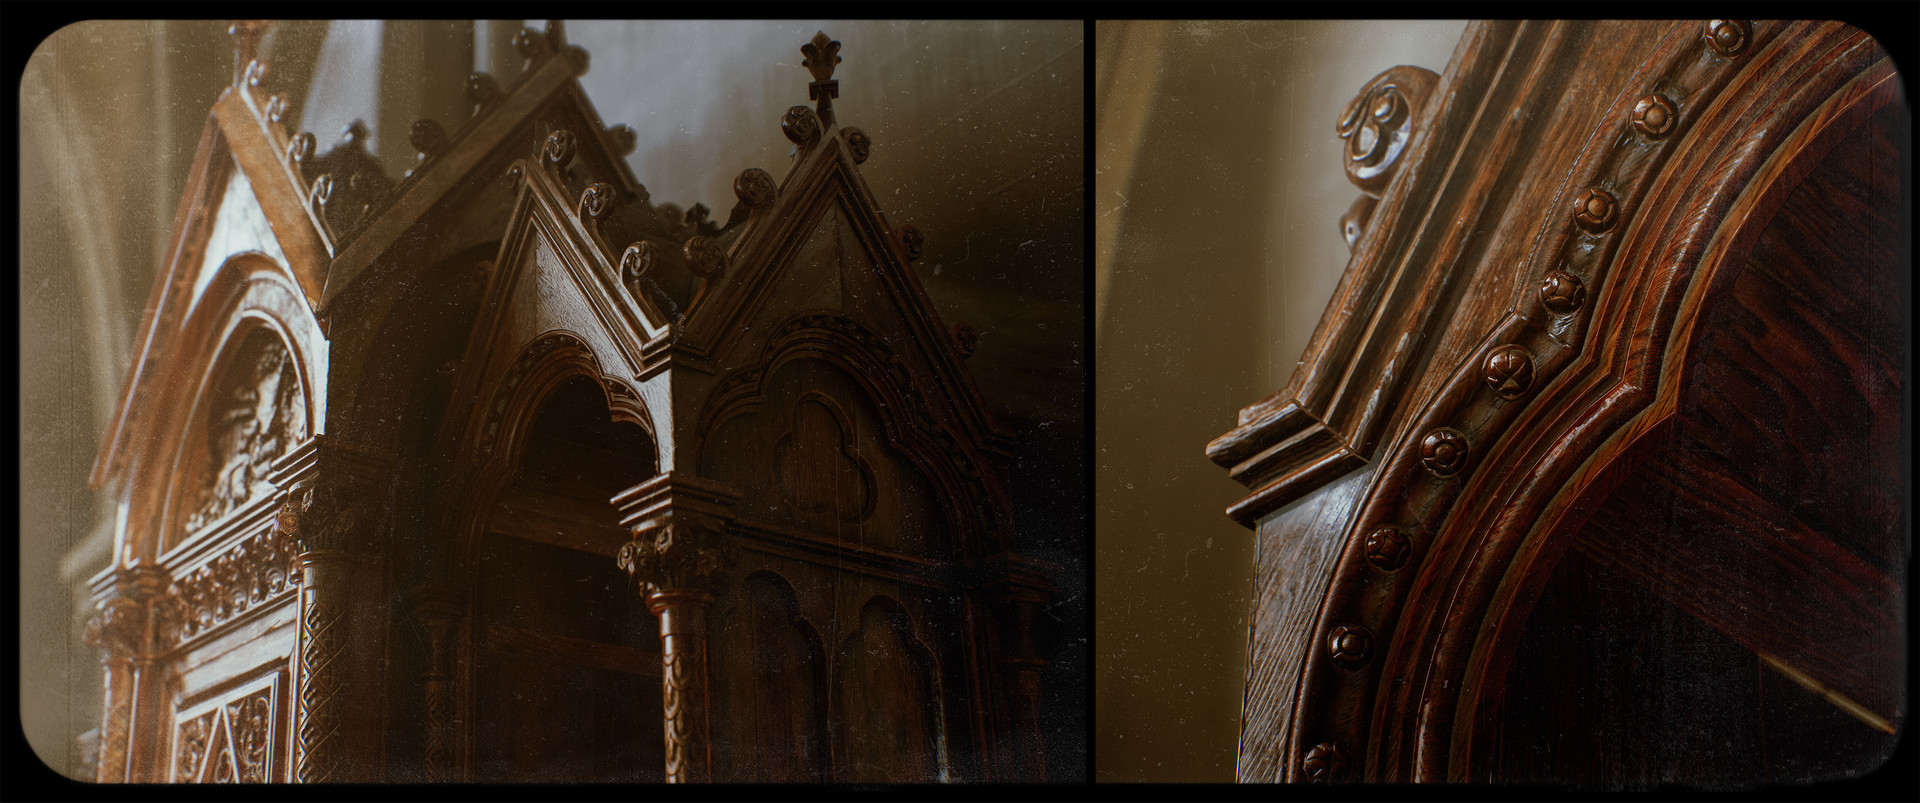
I identify this piece of art at the forefront of the industry because Walid has employed an array of the best tools used for texture creation to achieve a level of quality and realism with this asset. Walid has stated that he used a combination of Substance Designer and Painter as well as Megascans to create the wood textures for the model. The results are incredibly realistic and as someone who has been trying to create similar wood carved assets for my major project, I can see the obvious difference in quality between us as artists.

https://cdna.artstation.com/p/assets/images/images/011/738/262/large/walid-k-perrussel-theconfessionnal-angle-2.jpg?1531154486
K-PERRUSSEL, W. (2018), Gothic Confessional. [Online Image]. Available at: https://www.artstation.com/artwork/Jxz6R [Accessed: 27/07/2018].

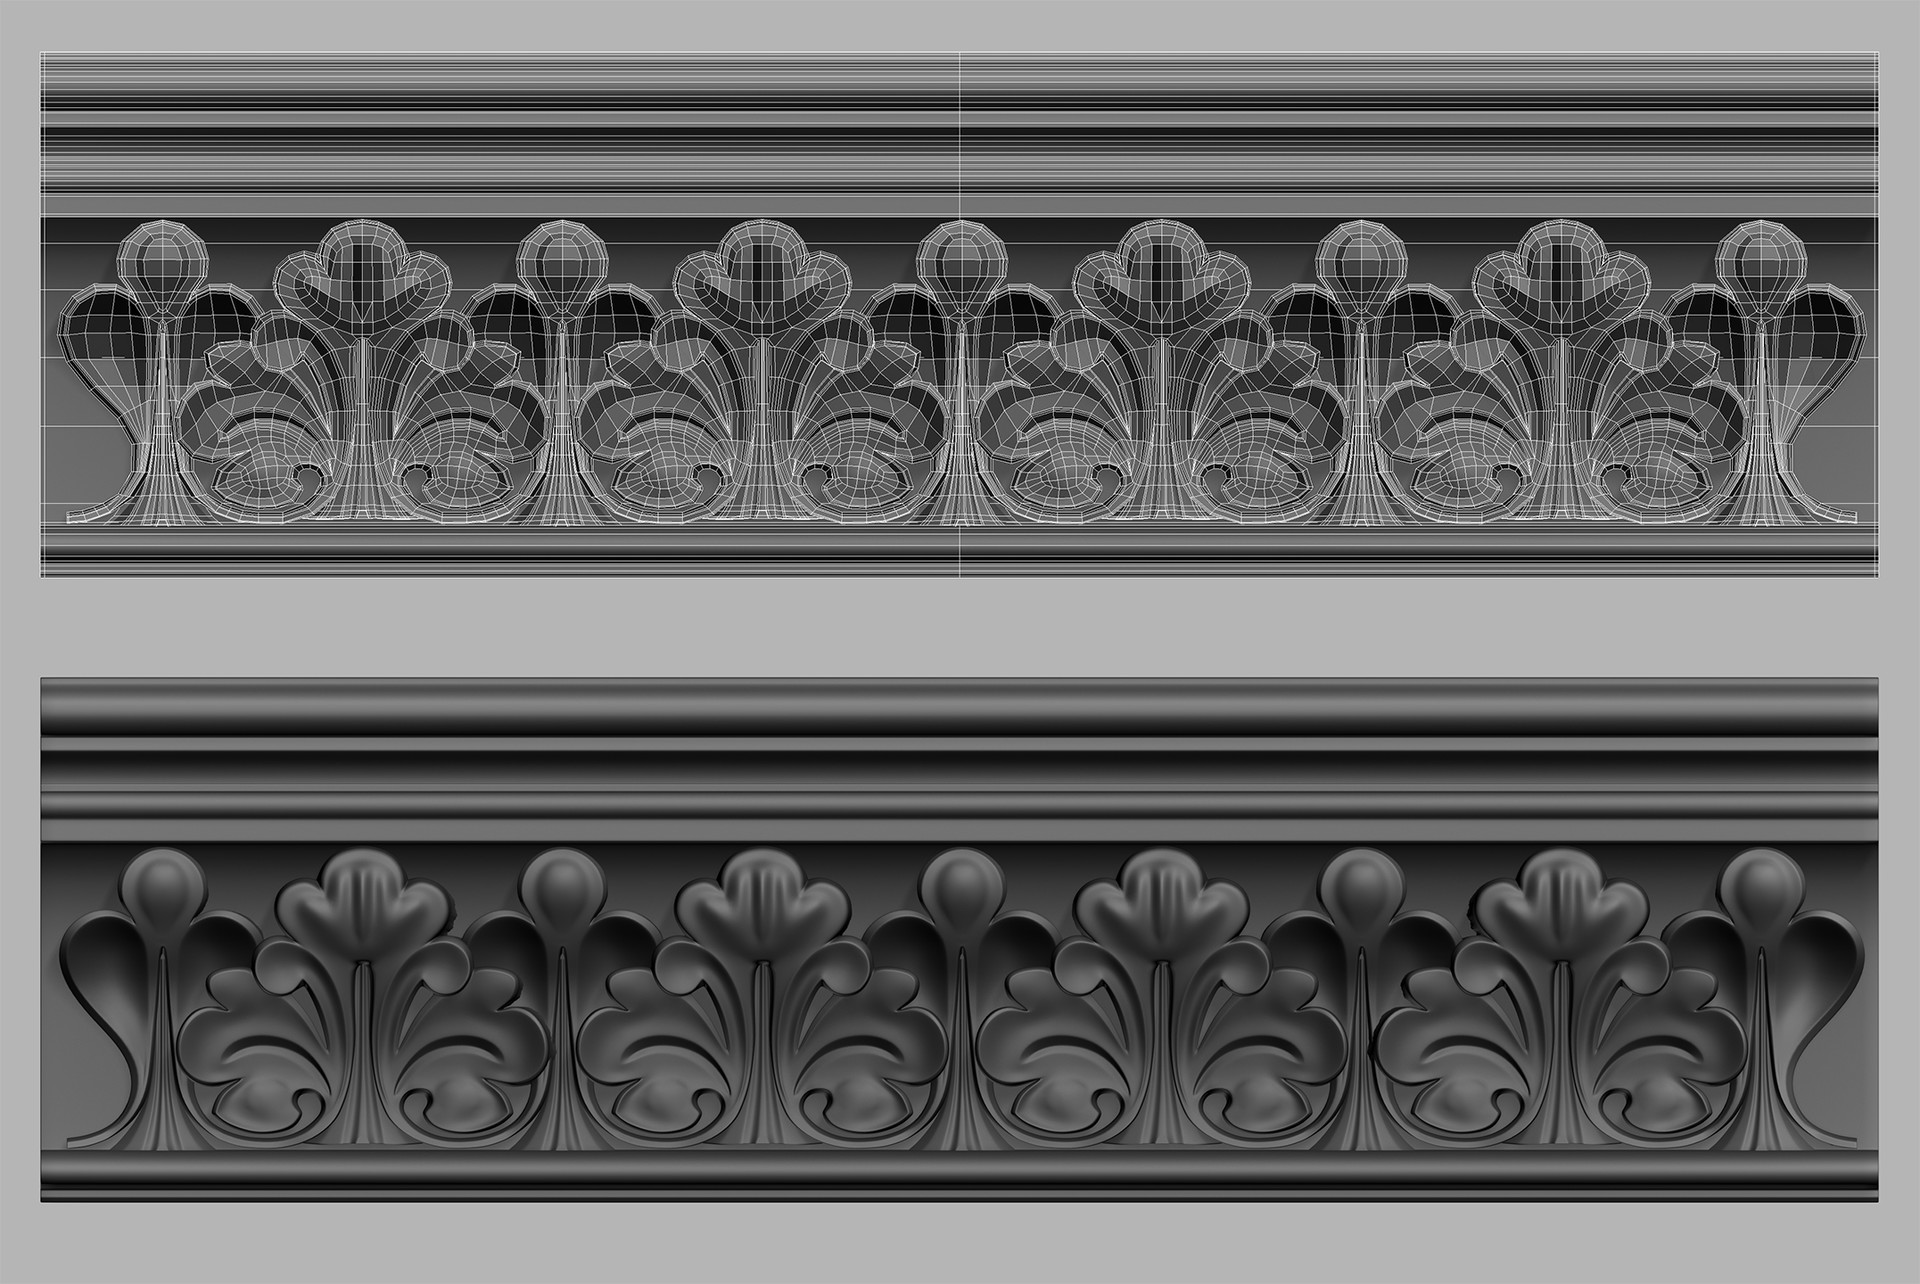
One thing that I found interesting, was that Walid had used 3DS Max to create the ornate high poly details of the model, as opposed to sculpting them in ZBrush. This is reassuring information to me as I create my high poly details in much the same way, by subdividing the geometry and adding smooth modifiers to them in 3DS Max. I have often worried that if I didn't use ZBrush to create high poly detail then I would be less competitive from an employability standpoint. It's a relief to know that using Max as an alternative is still viable amongst professionals.

 https://cdnb.artstation.com/p/assets/images/images/011/741/289/large/walid-k-perrussel-ornement-trimt.jpg?1531166706
K-PERRUSSEL, W. (2018), Sub-D Ornate: Gothic Confessional. [Online Image]. Available at: https://www.artstation.com/artwork/Jxz6R [Accessed: 27/07/2018].

This piece was a bit of an eye opener for me because the texture work Walid has displayed looks so realistic. The wood grain in particular is very life like when compared to the wood texture I made using Substance Painter. I would like to start investing time into learning to use Megascans, as it is clear that it produces photo-realistic results.

Thursday, 26 July 2018

Week 10 - Thursday: Foliage Decal Experimentation

Today I have been creating decals designed to replicate the intricate vines growing on buildings like this:

https://blogger.googleusercontent.com/img/b/R29vZ2xl/AVvXsEg-gdPVdJriNQnz8wISZ3SipEjbs5Fg7E0i9lHcnzbbi8WJAP_BrWLRYjpFCpmHkbezAGKYUGH8wCwIayx-A31lc71I_Ua75TbbkeIi_-jwcqJjB1P4nNQ-pzNJQUE7JlNPw_DiGa7nmhA/s1600/building_vines.jpg
 Vines ensnaring a house.

Here is vine decal I created based on the image above.

A vine decal for use in Unreal Engine.

I created a 3D model and baked it onto a flat surface plane in Substance Painter:

The vine created in 3D.


The 3D vine on the plane ready to be baked into a texture.

Below you can see a larger surface area created using the same technique:

A larger vine texture I created to go on the front of the house.

The vine decal has an alpha mask to blend it into the wall. You can see what it looks like within the scene below:

Pasting the vine decal into the Unreal Engine scene. I can move it over any surface.

I am trying to layer the scene with various decals so I can really make it look like it is overgrown.

The vines ensnaring the walls of the entrance hall.

I think it's going to be really important to bring foliage into the interior. These decals are my first step to bringing in the more naturalistic elements from outdoors.

NORTHAN, C. (2012), I also can't get enough of when vines take over buildings: [Online Image]. Available at: http://verveevolving.blogspot.com/2012/04/naturally.html [Accessed: 26/07/2018].

Wednesday, 25 July 2018

Week 10 - Wednesday: Tutorial Session

Hofstadter's law is a self-referential time-related adage, coined by Douglas Hofstadter and named after him. Hofstadter's Law: "It always takes longer than you expect, even when you take into account Hofstadter's Law". In relation to my major project this means that even factoring in my additional contingency time on my schedule, certain tasks are going to run beyond my allotted time frames.

The last week of my project plan. Week eleven will be the last week I will spend on project development.

I am aiming to have all the development work of my major project complete by the end of week eleven. However factoring in Hofstadter's law, I have decided to spend the last week polishing what I already have in my environment as opposed to creating any new major assets.

During my tutorial session I was introduced to the concept of "triage" which is a medical term used to assign degrees of urgency towards patients with wounds or illnesses to decide the treatment order of a large number of patients or casualties. Whilst grim, the concept is quite helpful in determining what areas of my project I should spend my remaining time working on. I was demonstrated vividly that if something couldn't be salvaged then it was optimal to let it go and work on something that was achievable. With this in mind I will be aiming to perfect the debris and finish adding foliage to my environment. I have been using elements such as grass and trees from the Unreal Engine "Open World Demo" as these are high quality vegetation assets that have saved me a great deal of time that I haven't had to model myself.

As these foliage elements are not the focus of the environment and I am not gearing my portfolio toward naturalistic objects, I feel it will be acceptable to use them as window dressing to flesh out the mansion environment. Doing this should save me time and enable me to meet the deadline I have set myself for week eleven.

HOFSTADTER, D. (1979) Godel, Escher, Bach: An Eternal Golden Braid, 20th anniversary ed. New York: Basic Books.

Tuesday, 24 July 2018

Week 10 - Tuesday: Additional Rooms

I have been creating additional rooms to flesh out the mansion environment that should create the illusion that the level is much larger than it actually is. I have done this by creating a long corridor that branches off from the main entrance hall and opens up into a larger space. When viewed from the stairway it creates a nice sense of scale.

The hallway viewed from the staircase.

Using my established criteria for defining interior space, I have tried to use the boundaries of this hallway to constrain the players movements, locking them in one direction as they proceed down the long corridor. I think this creates a sense of foreboding and I am looking forward to reflecting this in my promotional video, as I want the camera to glide slowly down the hallway as the music intensifies.

The hallway corridor which will be bridging the entrance hall and sitting room together.
 
The hallway has been constructed of smaller components that I will be repeating within Unreal Engine. I created these curtains with the intention that they could be seen from the exterior as well, hinting that the player can explore in that direction.

Modular curtains and windows.

I want to simulate light beams being projected through the curtains as I think this will further illustrate the time of day and make the player feel the heat and stuffiness of the building.

Here are my curtains textured within Substance Painter. I sneakily reused my wallpaper texture and recoloured it red.

The curtains themselves were created using the cloth simulation similar to my carpet model. I have kept them quite low poly.

BARNWELL, J. (2017) Production Design for Screen: Visual Storytelling in Film and Television. New York: Bloomsbury Visual Arts.

Monday, 23 July 2018

Week 10 - Monday: Small Chair

As I draw closer to the end of my degree, I have been researching ways that I can make my portfolio stand out and be more marketable to employers. I found an article on Artstation interviewing industry veteran Robert Hodri, who is currently the senior environment artist at id Software. In the interview he highlighted what to focus on when building a game-centric portfolio.

"At the beginning of your career, you normally won’t be working on a whole level or environment where you have to do everything on your own. At least that’s how it is when you’re working on bigger AAA games. Usually you’re assigned to work on smaller props. That’s why I think it’s important to have at least a couple of high quality props and textures in your portfolio. That can be anything from crates, rocks to weapons and vehicles. Just show that you can create good game art and are familiar with the whole process. Making high poly meshes and baking them down on a low poly is something that every 3D artist needs to know and your portfolio should show that." - Robert Hodri, Senior Environment Artist at id Software.

With this statement in mind I have been creating some more props that I will be displaying in my portfolio. I have been trying to find a balance between giving the model a nice silhouette and keeping it low poly. As such this asset is a lot more expensive than the previous armchair I had created. Currently the mesh sits at around 9k triangles. I can reduce the mesh further so that it is less expensive in-game, but right now I feel getting a strong portfolio piece is of greater importance.


My new chair props that I have put in my portfolio.

I now have two distinct chair assets in my portfolio showing that I can create props in different styles if needed. I based this model off of this Italian Baroque chair as I felt it would provide me with a good challenge:

A 19th Century Italian Baroque Chair that I used as reference.

I am going to continue tailoring my Artstation page to what triple AAA studios are looking for, as I feel these will be where the most employment opportunities are coming from.

ESCH, N. (2018), One 19th Century Italian Baroque Chair in Peacock Blue [Online Image]. Available at: https://www.monc13.com/products/one-19th-century-italian-baroque-chair-in-peacock-blue-furniture-seating [Accessed: 23/07/2018].

MON, S. (2017) Everything You Need to Know to Become a Game Environment Artist. [Online] Available from: https://magazine.artstation.com/2017/03/game-environment-artist/ [Accessed: 23/07/2018]

Friday, 20 July 2018

Week 9 - Forefront Friday: Star Wars Battlefront (2015)

I am planning to include a lot of foliage and vegetation growing inside of my mansion environment to emphasize how much time has passed since people actually lived there. This will mean that I need to create some unique assets myself as nothing within the demo pack will help with this.

Before creating my own vegetation I have decided to research some examples at the forefront to better understand how the games industry approaches realistic vegetation.

One game that has used photorealism to great effect is DICE Studios and EA Games “Star Wars Battlefront” (2015). Whilst the game itself has been the target of much criticism due to EA’s business practices, few could argue that the games graphics are incredible.

The planet Endor recreated in Star Wars Battlefront 2015.

I consider Star Wars Battlefront (2015) to be at the forefront of the industry because of the level of consideration that has gone into recreating the iconic environments from the films, and the detailed processes DICE have employed to create photo-realistic terrain.

The team at DICE would shoot photos on-location and plan their trips using a breakdown beforehand so they knew which assets needed to be captured during that shooting session. An article from website 3D Scan Expert states that the team put in a lot of effort to ensure that these photo shoots were efficient, because with Photogrammerty often times people end up shooting either too many or too few photos. Below you can see an example of the breakdowns the team would use when going on a photo shoot.

https://3dscanexpert.com/wp-content/uploads/star-wars-battlefront-3d-scanning-elements-768x432.png
An example of the breakdowns DICE Studios used to help organise their photo sessions.

The massive amount of photos were then taken and turned into usable game assets. The team would go through more of less the same phases as they would if they were creating the vegetation in a traditional way but in a quicker time frame. Below you see a comparison between the estimated time to create an asset for an earlier game (Battlefield 4) that used traditional methods and the Photogrammetry pipeline used Star Wars Battlefront. Compare the lengthy time for high poly modelling in a traditional way compared to creating the asset via photo scanning.

star-wars-battlefront-3d-scanning-time
A comparisson of the time required to create an asset with Photogrammetry versus traditional methodology

It is quite clear that DICE have put in great effort into planning the creation of vegetation for their game. My project plan mainly factored in hard surface modelling and texture creation. I did leave myself a small window to create organic assets but it is clear that such a small window will not yield results anywhere near as impressive as Star Wars Battlefront.

This is not a huge issue for me as I am not focused on becoming an organic modeler for my career. Therefore I don’t wish to spend too much time creating detailed vegetation. Photogrammetry definitely seems like the best option for realistic vegetation and foliage due to the near perfect replicas it produces. Because of this, the ability to create detailed vegetation from scratch may not be the most sought skill in the industry at the moment.

Because I don’t have the resources available to create realistic photo scanned models, one option may be for me to download another asset pack from the Unreal Engine marketplace, one that is well suited to create indoor vegetation. I have already saved time on assets such as trees and grass on the exterior sections of my environment, however I am still interested in creating individual pieces such as ivy and weeds myself. Because I want them to conform to the shape of my building perfectly, this is something that I feel I will have better control over if I create them myself.

Ultimately I feel a blending of both my own and professionally made assets will be the best course. I have already made use of the Unreal Engine marketplace, so by studying the assets available I will be able to see how they were created and apply this knowledge to my own work.

DICE. (2015) Star Wars Battlefront. [DISC, DOWNLOAD] Microsoft Windows, PlayStation 4, Xbox One. Redwood City: Electronic Arts.

DICE. (2015), EndorDICE. [Online Image]. Available at: https://vignette.wikia.nocookie.net/battlefront/images/8/81/EndorDICE.jpg/revision/latest?cb=20151111221829 [Accessed: 20/07/2018].

DICE. (2015), PhotoBreakdown. [Online Image]. Available at: https://3dscanexpert.com/wp-content/uploads/star-wars-battlefront-3d-scanning-elements-768x432.png [Accessed: 20/07/2018].

GAMASUTA. (2016) GDC: See how DICE used photogrammetry to bring Star Wars Battlefront to life . [Online] Available from: https://www.gamasutra.com/view/news/265747/GDC_See_how_DICE_used_photogrammetry_to_bring_Star_Wars_Battlefront_to_life.php [Accessed: 20/07/2018]  

LIEVENDAG, N. (2016) How 3D Scanning was used to create the worlds of Star Wars Battlefront. [Online] Available from: https://3dscanexpert.com/3d-scanning-star-wars-battlefront/ [Accessed: 20/07/2018]  

Thursday, 19 July 2018

Week 9 - Thursday: Using 3D Scan Data to Create a Bust of Pallas

With the rise of 3D printing, high quality scans of real world objects have become increasingly easy for people to access. What this means for me as a 3D artist is that I now have a vast resource of detailed 3D models available to tap into.

I found this 3D scanned bust of Pallas Athena from the Altes museum in Berlin:

3D scanned bust of Athena.

I chose a bust of Pallas as a tribute to Edgar Alan Poe's The Raven. In that poem the bust of Pallas Athena represents wisdom, indicating the narrator was a scholar. I really admire when writers leave little clues that inform the reader about a character's personality. I am trying to do the exact same thing in a visual sense, so I wanted to pay homage by including a similar bust above the chamber door. Perhaps the former owner of my mansion also prided himself as a scholar?

In its raw form the model sits at over 600,000 thousand triangles. Obviously not feasible to use as a game asset:

The downloaded 3D model.

I created a low poly model around the high poly mesh and got it ready for surface transfer within Substance Painter:

The low poly variant of the bust of Pallas.

Baking and texturing the maps in Substance Painter was a fast process as I used a lot of smart materials to generate the dirt detail to highlight the bust's facial features.

 The normal map of the bust.

The fully textured asset within Unreal Engine.

It's a bit jagged but because it takes up such a small amount of space in the environment I don't think this will be noticeable. Thanks to the availabilty of 3D scanned assets I now have a wide selection of easy to make 3D assets for my game environment. I don't want to rely too much on free assets however because I am using this project as a demonstration of my own modelling ability. As such I will use this technique when I need to quickly create something that is not feasible within my current timeframes.

MY MINI FACTORY (2015) Bust of Athena at The Altes Museum, Berlin. [Online] Available from: https://www.myminifactory.com/object/3d-print-bust-of-athena-at-the-altes-museum-berlin-14041 [Accessed: 19/07/2008].

POE, E. A. (1845) The Raven. New York City: The American Review.

THE BRITISH MUSEUM (2017) A new dimension in home shopping. [Online] Available from: https://blog.britishmuseum.org/a-new-dimension-in-home-shopping/ [Accessed: 19/07/2008].

Wednesday, 18 July 2018

Week 9 - Wednesday: Tutorial Session

For this week's tutorial session I have been getting some help with adding foliage to my scene in Unreal Engine. Because I don't have the time to invest in creating my own trees, I was recommended to use some of the freely available assets on the Unreal Engine marketplace. I downloaded the Epic Games Open World Demo Collection (2015), which has given me access to a few tree assets as well as some grass. I have also been creating some custom vines that will be growing on the walls of the exterior.

 The vines I have created in 3DS Max.

I was introduced to the foliage brush within Unreal Engine and was shown how to apply lots of assets over a large surface area efficiently. I have begun painting the grass into my environment scene:

The exterior with the grass beginning to be painted in using the foliage brush.

One problem that I have noticed with using the foliage brush is that it treats all the objects that have been painted with it as one asset. Because there is so much grass in the scene the lightmap for this element is ridiculously huge. It was causing my light bake times to get very expensive so as a solution to this I have disabled shadow casting on the grass. This will make the grass look slightly less-realistic, however because there is so much of it in the scene the fact that each blade of grass isn't casting a shadow shouldn't be noticeable.

I am starting to place trees within the scene as well. I am hoping to create some nice long shadows across the environment to indicate the time of day and create some visual interest with the lighting, as currently it feels rather flat.

The asset pack I am using contains 4 types of tree, several rocks and smaller vegetation like grass. Each asset comes with its own materials.

EPIC GAMES (2015). Open World Demo Collection. [online] https://www.unrealengine.com/marketplace/open-world-demo-collection [Accessed 17/0/2018].

EPIC GAMES (2015). Open World Demo Collection. [Online Image]. Available at: https://cdn1.epicgames.com/ue/item/000_OverView-1920x1080-c3379c40227fa234cecd992feaade9b5.png [Accessed: 18/07/2018].

Tuesday, 17 July 2018

Week 9 - Tuesday: Roof Damage

In addition to the debris that I have added to the interior, I am also trying to add external damage to the mansion. I took a look at reference of derelict buildings, some from games and others from real photos, to help me focus in on which details to create.

https://cdnb.artstation.com/p/assets/images/images/006/493/351/large/mark-ranson-steamshotcarentan-03.jpg?1499031560
Days of War map Carentan.

 Bush Park, Detroit.


 A derelict house in Ireland.

One element that I really like across all of these images is the large holes in the roofs revealing the scaffolding underneath.

I decided this would be perfect to add to my scene because the roof takes up such a large space in the environment but is an almost featureless element. Adding some variation like holes and broken tiles will really help to break up the flat surface.

I started by cutting out a hole in the geometry of my roof in 3DS Max and then built some exposed wooden planks that would fit in the holes:

Wooden scaffolding that I created in 3DS Max and then textured in Substance Painter. I tried to make the wood look as old and warped as possible.

I created a few planks and then pieced them together into a pattern that I could repeat. I created a wooden plank texture in Substance Painter and then exported the pieces into Unreal Engine.

Here you can see the wooden planks repeated a few times in Unreal Engine. They have helped to break up the otherwise simple roof elements.

I am going to add similar holes across the roof and perhaps even some broken windows. I am aiming to make the exterior scene instantly tell the player everything they need to know about the state of the mansion inside.

Front view of my roof debris.

ALLEN, K. (2005), Derelict house at Raw [Online Image]. Available at: https://www.geograph.org.uk/photo/76559 [Accessed: 16/07/2018].

FERNANDEZ, M. (2012), Detroit o el atractivo de una ciudad hundida [Online Image]. Available at: https://www.yorokobu.es/detroit-o-el-atractivo-de-una-ciudad-hundida/ [Accessed: 16/07/2018].

RANSON, M. (2017), Days of War map Carentan [Online Image]. Available at: https://www.artstation.com/artwork/OVB6y [Accessed: 15/07/2018].

Monday, 16 July 2018

Week 9 - Monday: Debris Simulation

After reading up on how I can better utilise the mise-en-scene of my environment, I decided that I wanted to exaggerate the level of decay that the mansion has fallen into. To do this I came up with a way for quickly adding a large amount of debris to my scene, which I have implemented within my environment today.

Simulating the Debris

Before starting I had two factors to consider. The first was time. This would be how long it would take for me to populate the scene with all the debris that I wanted to include. The second factor was object placement. This would be to make sure that the debris was placed logically and looked natural within the environment.

I could have chosen to spend a lot of time placing objects in my scene manually by eye, but that would have wasted precious hours. Conversely I could have placed things in the scene quickly without much consideration for the logical placement of objects, but that would result in an illogical mess that would look somewhat fake.

The last few weeks of my major project plan.

Because this is the beginning of week nine and I only have three weeks remaining to complete the environment, I decided that time was the most important factor at play. I had the idea to use the Mass FX tool within 3Ds Max to simulate the falling of debris within my scene. By simulating falling objects in the environment like this I could make the debris placement look natural whilst saving myself a LOT of time.

First I had to test whether this technique would work for my purposes. To experiment with my idea, I created a dummy scene with simple box geometry and applied physics to each box. You can see the result of this test below.

Mass FX simple box geometry simulation.

As you can see this was both a quick and realistic way of creating a mess. The boxes fall in a convincing manner resulting in a more natural placement of the objects than I would have been able to achieve if I had tried to place them within my scene by eye.

The beauty of this setup is that I can choose to add more or less objects to the simulation and this will affect the final result of the debris being scattered across the environment.

Once I was satisfied that the simulation was going to work, I created some assets to use as debris. The objects are all using the same texture, making it easy for me to add further details to the material in Unreal Engine. I intend to add a layer of dust to the objects which will only affect the top facing surfaces of the models. This will help break up repetition, as multiple bricks will have dust covering them at a different angle from one another.

 My fully textured debris assets as seen in Substance Painter.

Below you can see the wireframes of the assets. I tried to keep them low poly but high enough so that their silhouettes would still look good.

 The wireframes of the debris assets.

I applied physics to the objects and then created a dummy scene so that I could quickly simulate the objects falling onto each other.

The end result of the Mass FX simulation.

A close up of the debris. You can see how organic the placement of the objects is.

I ran the simulation a few times and once I was happy with the final output I baked the final debris into static geometry and exported it out of 3DS Max into Unreal Engine.

The debris model in my scene within Unreal Engine. I added some additional leaves to the floor as a texture with an opacity mask.

I am pleased with the end result as I feel already this is making the abandoned mansion feel far more authentic. I would like to continue to layer up the floor with additional dirt masks and other bits of debris.

I think it was absolutely worth expending a little extra time experimenting with mass FX simulations as now I can use this technique again and can potentially speed up my workflow by a large amount.

Friday, 13 July 2018

Week 8 - Forefront Friday: Horizon Zero Dawn (2015)

I am at the end of week eight of my major project development. This leaves me with just three weeks remaining to finish my environment. I believe I will be able to complete this project on schedule and as such I am going to be sticking very closely to the final weeks of my project plan.

 Entering the final four weeks of my project development.

Before I start next week I have been researching games that I feel have particularly strong environment design. Horizon Zero Dawn (2017) is game that features a post-apocalyptic world that is slowly being enveloped by nature. I love the juxtaposition of nature and technology and I think this has given the game incredibly strong visuals.

Horizon Zero Dawn trailer.

I place this game at the forefront of the industry because it offers a fully open world similar to the Legend of Zelda: Breath of the Wild (2017). Unlike Zelda however, this game has a far more realistic graphical style which makes the fact that it can display all those assets on screen at once very impressive.

I have been drawing inspiration from the Game's foliage and vegetation that is growing everywhere in the world and ensnaring old structures. I want my environment to have a similar feel, in that nature is beginning to take its course and overtake the mansion.

Over the next few weeks I am going to be experimenting with creating my own foliage and using it within Unreal Engine. I feel this is perhaps one of the most important elements that will be within my environment, as realistic feeling vegetation will make my project far more believable. I am making references of how Horizon Zero Dawn has used particular types of vegetation that I think will be effective in my scene. So far I am interested in creating ivy because I like how it conforms to the shape of buildings and isn't placed randomly.

GUERRILLA GAMES (2017) Horizon Zero Dawn. [DISC, DOWNLOAD] Playstation 4. San Mateo: Sony Interactive Entertainment. 

PLAYSTATION (2015) Horizon Zero Dawn - E3 2015 Trailer | PS4. [Online Video]. June 15th. Available from: https://www.youtube.com/watch?v=Fkg5UVTsKCE [Accessed: 13/07/2018].

Thursday, 12 July 2018

Week 8 - Thursday: Substance Painter Texture Sets

I've been thinking how I can best utilise every element of my environment so that the mise-en-scene feeds the player as much visual information about the story as possible. I have a large area of empty wall space that I think could be put to better use, so today I will be experimenting with ways in which I can make them more thematically appropriate.

Below you can see an image of how the walls look in the current version of the scene:

 This is an image from my scene where the walls have no material applied to them.

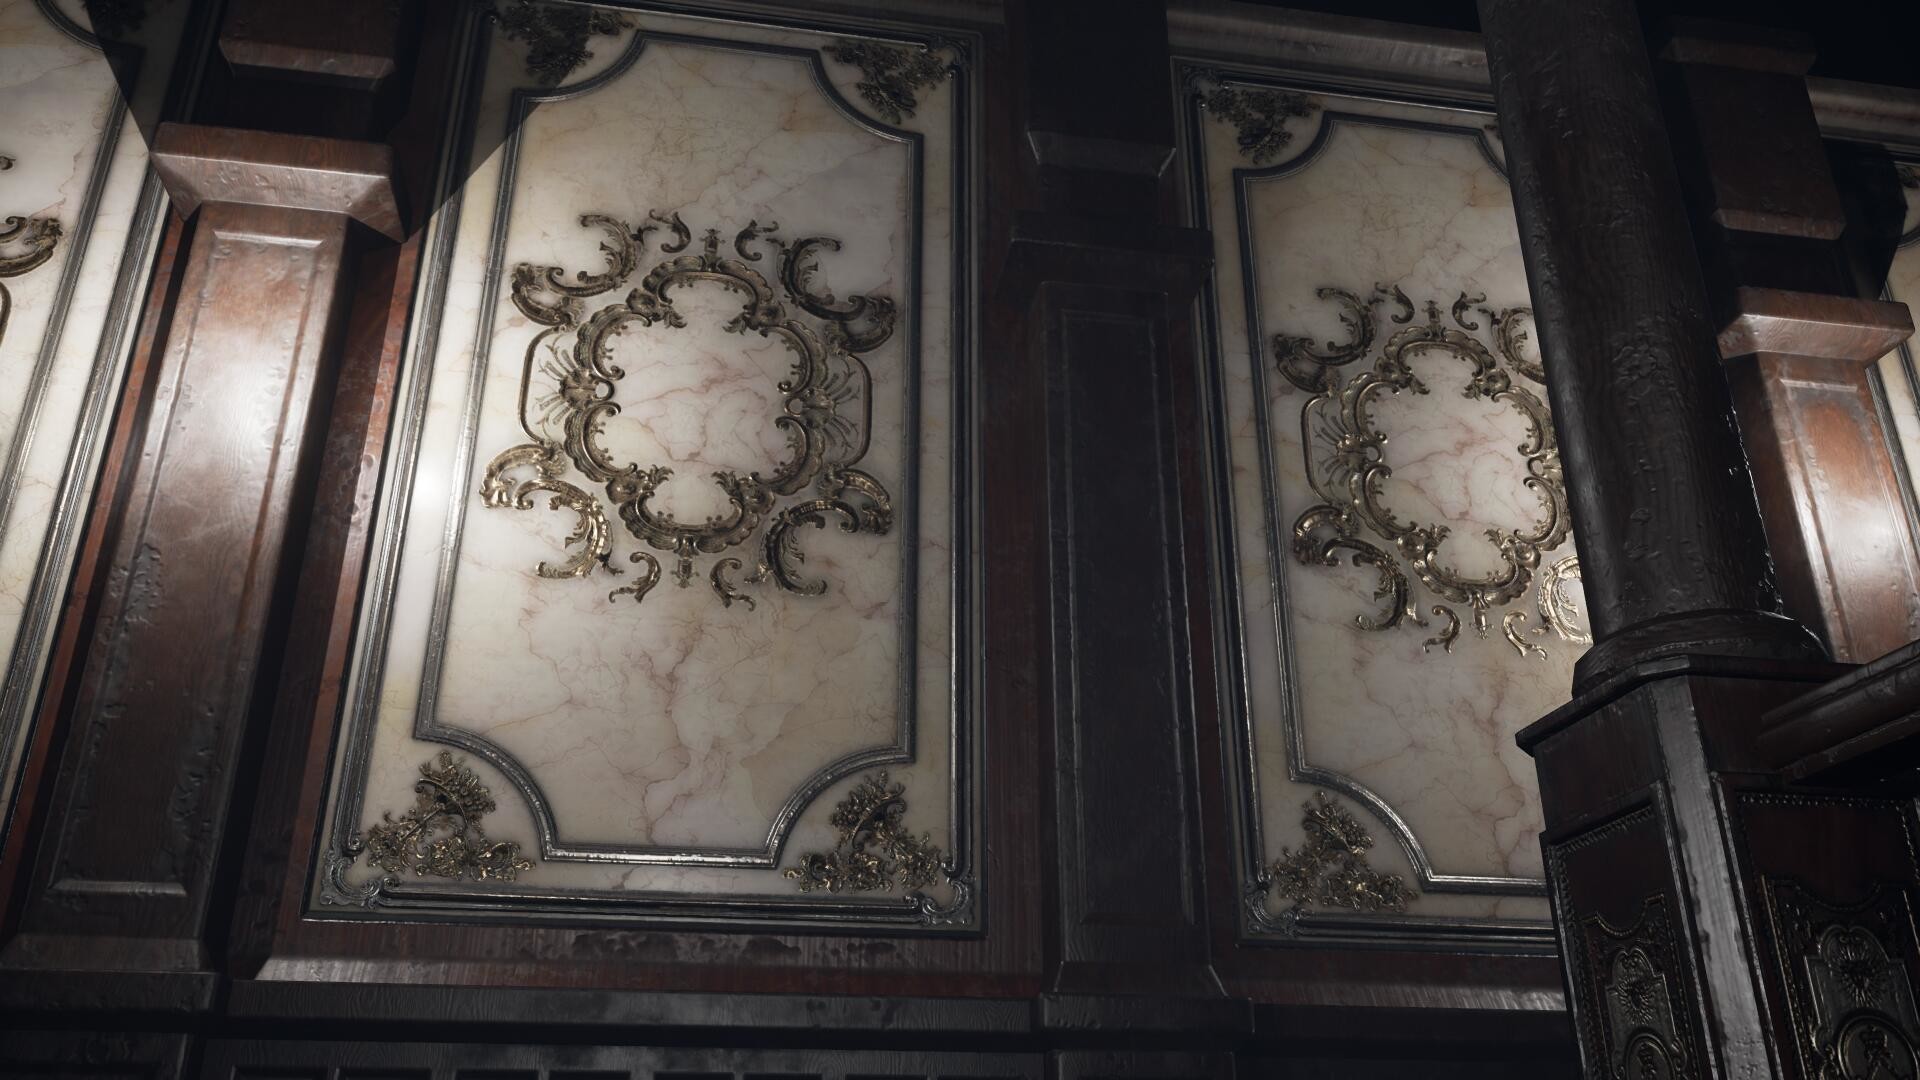
If you loaok at the walls carefully you can see an early pattern that I have modelled onto them. This is because I originally wanted to use a baroque pattern similar to B.O.W. Qin's work:
https://cdnb.artstation.com/p/assets/images/images/005/081/445/large/b-o-w-qin-w5.jpg?1488332739
B.O.W. Qin's ornate wall panels.

Whilst I felt these looked nice, I didn't think using this element within my scene would be furthering my project goals which is to tell a story purely through visuals alone. I wanted to take this opportunity to show the level of decay the mansion has fallen into and didn't think using these patterns were the best way of doing that.

So deleting these, I have gone back into 3DS Max and created some new walls. I want to be able to give each segment of the wall it's own unique level of decay. I'm not sure what the best way to do this will be, but I know that I want to do this all within the material and not rely entirely on using decals in Unreal Engine. I can still choose to add them later on to further the level of decay on the walls,  but I would rather be able to paint unique details in Substance Painter first so that I can make them less repetitive.

My new walls in 3DS Max. Each segment has been individually UV mapped with each one having its own material.
 
It is fortunate that I couldn't decide on the design of my walls sooner because it has led me to learning about Texture Sets within Substance Painter:
A video tutorial explaining texture sets within Substance Painter.

I have decided to use wallpaper to cover my walls. This is because I think wallpaper gives me a lot of room to get creative with the level of dereliction. I can make some strips of wallpaper peel off whilst others can be ripped. I think this will give me a nice mix of visuals and will push the "abandoned" vibe much more than if I had used the baroque pattern.

This is the wallpaper texture that I created in Substance Painter.

After watching the tutorial on how texture sets work, I found that I can load all of my different wall segments and paint them in on go within Substance Painter. I have made a wall paper pattern and layered it up with varying levels of decay. When I begin painting in Substance I will be able to create custom levels of grime and dirt. See an example of this below:

I can paint on varying levels of decay to my wallpaper material. Some I will leave cracked, whilst others will be peeled off.

I have loaded all of my walls into the program. I had to copy my material layers from one set of materials to another in order for this to work. See the image below for what I mean:

Notice the layers tab in the top right of this image. I started by creating one material that I could paint details on to and when I was happy this looked good, I copied all of these layers into the other material slots. I have 8 materials in total.

I've had to copy each layer into a new material slot for this to work. Currently Substance doesn't let you paint them across all the elements within the scene, so I had to cycle between the material slots to paint on certain parts of the walls. Doing this has let me paint each wall segment with its own unique pattern.

So far I am really pleased with the look of these new walls and I feel they are going to be much stronger than what I originally had in mind. After this success I think I will see if there are other areas that I could perhaps make look more decayed.

A close up of the peeled wallpaper I have created in Substance Painter.

ALLEGORITHMIC (2015) Substance Painter Tutorial – Fundamentals 04: Texture Sets [Online Video]. August 13th. Available from: https://www.youtube.com/watch?v=2NFXuFQYjvo [Accessed: 12/07/2018].

Q. B.O.W. (2017), My daily study Ⅱ-Ⅰ [Online Image]. Available at: https://www.artstation.com/artwork/8LndO [Accessed: 12/07/2018].